- Consul by HashiCorp
- Containers In Production Map
- PR - Performance On Large clusters Reduce updates on large services #4720
- Keynote: Consul Connect and Consul 1.4
- Deployment Guide
- jweissig/76-consul
- Video Recordings from HashiConf 2018
- HashiCorp Learn
- #74 - Nomad
- #63 - Istio
Hey, in this episode, I thought it would be cool to check out HashiCorp’s Consul product for easy Service Discovery. Consul is open-source and has a pretty active community around it too. Today, we’ll chat about common use cases, the server architecture, how a service registry works, and more. This episode is sort of broken into two parts, first we will cover much of theory around Service Discovery in general, then we will look a some demos of Consul in action.
Lets jump over to the ecosystem map for a minute and just look where Consul fits into the larger picture. So, I see Consul falling into this Service Discover category here. Consul is very much a behind the scenes supporting infrastructure type tool that you will rarely interact with directly once you have it all configured. Before we dive in, I just wanted to step back for a couple minutes and chat about the big picture of why you even need a Service Discovery type tool. Then, we can relate this to the core use-cases of Consul via a few diagrams and get a detailed picture of the problems Consul solves.
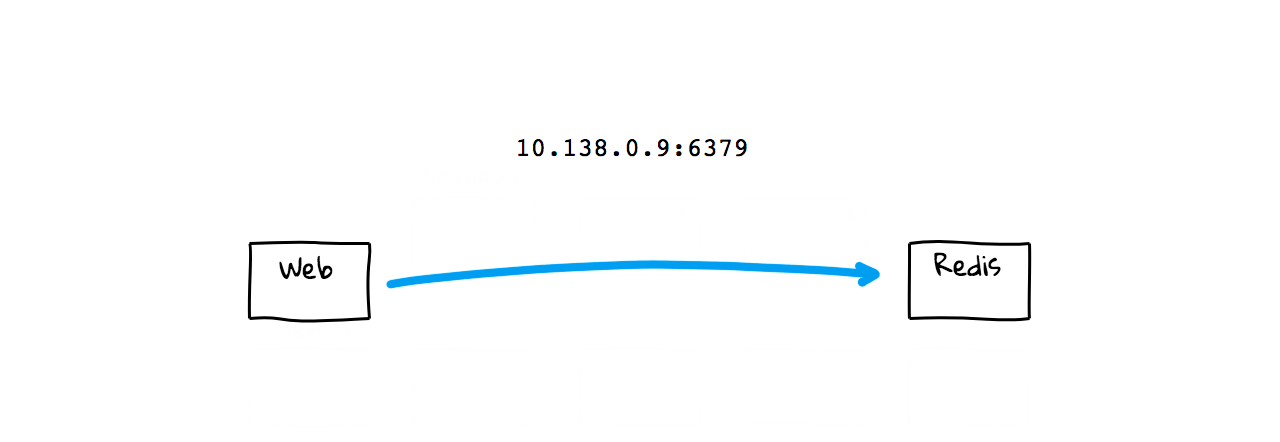
So, lets say you have two machines, a web server and a Redis content cache. These could be virtual machines, containers, or whatever. Now, lets say you wanted to connect from the web server over to your Redis server. How do you do that? Well, in our Web App, we need a way of knowing where this Redis instance is located on the network. If you are just a smaller shop, with only a few machines, you might just hardcode this network address right in your Web App, as it will likely never change. If things fail, you just restart it them, and it always stays at the same network address and port. In a sense, this is sort of simple Service Discovery, in that you want to discovery how to content this Redis content cache. So, to solve that problem, we just hard coded the network address and port information.
But, maybe your site is becoming more popular and you need to add more Redis instances. This creates a problem though, are you going to start hard coding all these IP addresses in your App? What if you need to do maintenance? So, you get the idea to create a DNS record now where you can sort of abstract the problem. Now, your Web App will just run a DNS lookup, and grab a listing of your current Redis instances out of DNS. Again, this is a form of super simple Service Discovery, in that you are using DNS to find instances. This is not super sophisticated but it mostly just works. You also have a little more flexibility now, as you are not hard coding things.
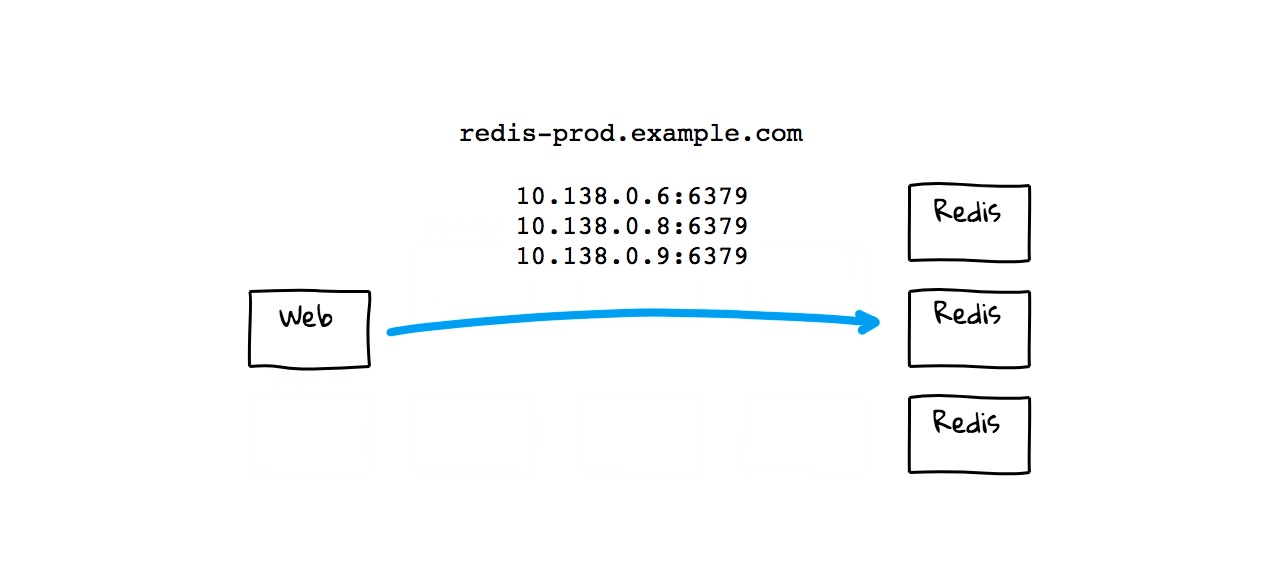
But, this method has a few drawbacks. First, you are manually doing things and that is probably alright for smaller sites with mostly static infrastructure, but breaks quickly as you grow. You are also using round robin load balancing and do not have much control over where your queries are routed. If things fail, you might be manually updating DNS zone files, to add and remove healthy instances. Also, some application do not respect DNS cache time to live values, so you might have stale records hanging around and need to reboot some things to pick up the latest values. But, for the most part, this just works when you are at a smaller scale.
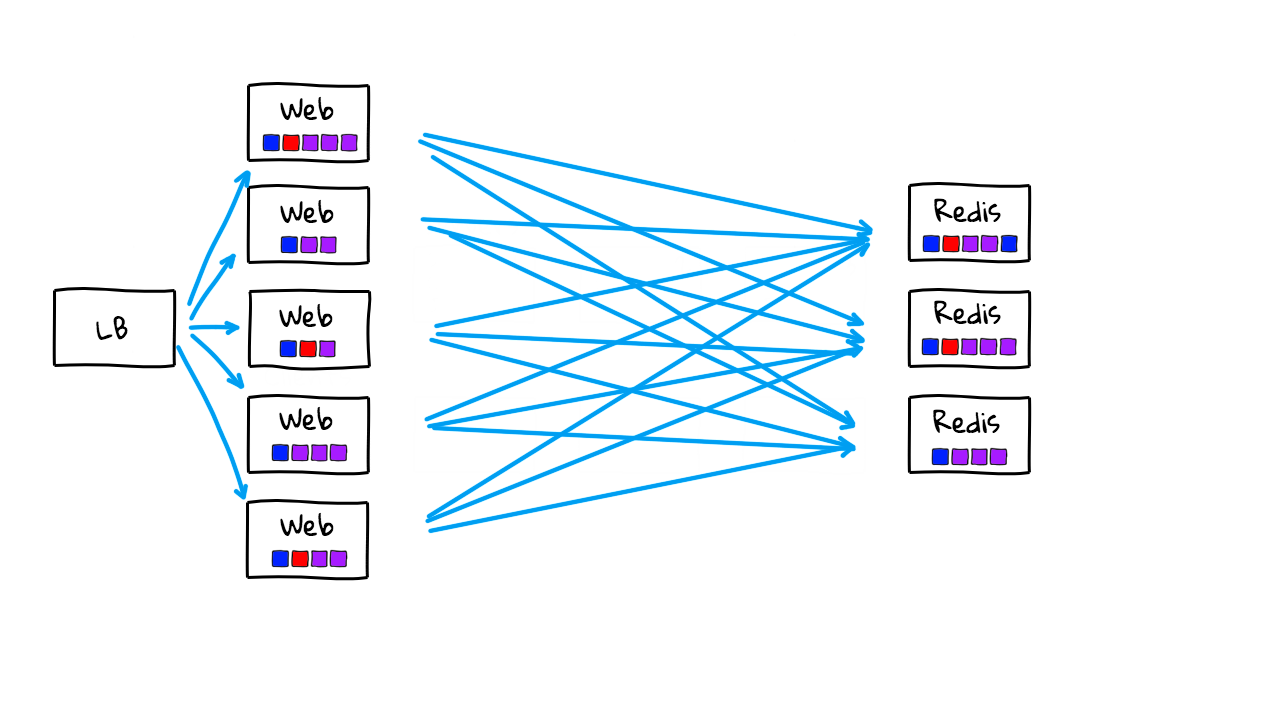
Alright, lets crank up the complexity scale, and get into the territory of where more advanced Service Discovery tools start to make sense. Lets say, business is booming now, and you added a bunch of additional web servers to handle the traffic. You also added a load balancer in here now too so that all traffic into your web tier is proxied through a single point. Again, we have all our web servers connecting out to our content caches. In reality, you would have databases, storage systems, content caches, and likely lots of other supporting services too. But, I’m just keeping things pretty simple for now.
Lets say you also adapted a container strategy and are moving from mostly static machines to a more dynamic environment. You can now quickly deploy new code changes and refresh infrastructure instance versions multiple times per day. These little boxes here are meant to show that we are running container instances now. So, now we can quickly spin up lots of Redis instances on the fly to closely fit with our traffic patterns. This might mean we scale from 10 to 20 instances throughout the day. You will also notice here that we are using fairly random IP addresses and ports. This is because we might have multiple container instances running on the same physical machines and they are just giving random IP addresses and ports. Containers also fail and are restarted throughout the day so this list is constantly changing. What about our web tier? Well, this is also scaling up and down throughout the day and our load balancer needs to know about healthy instances. These are also given random IP addresses and port numbers. Containers in here are also constantly being refreshed as they fail or we do new deployments.
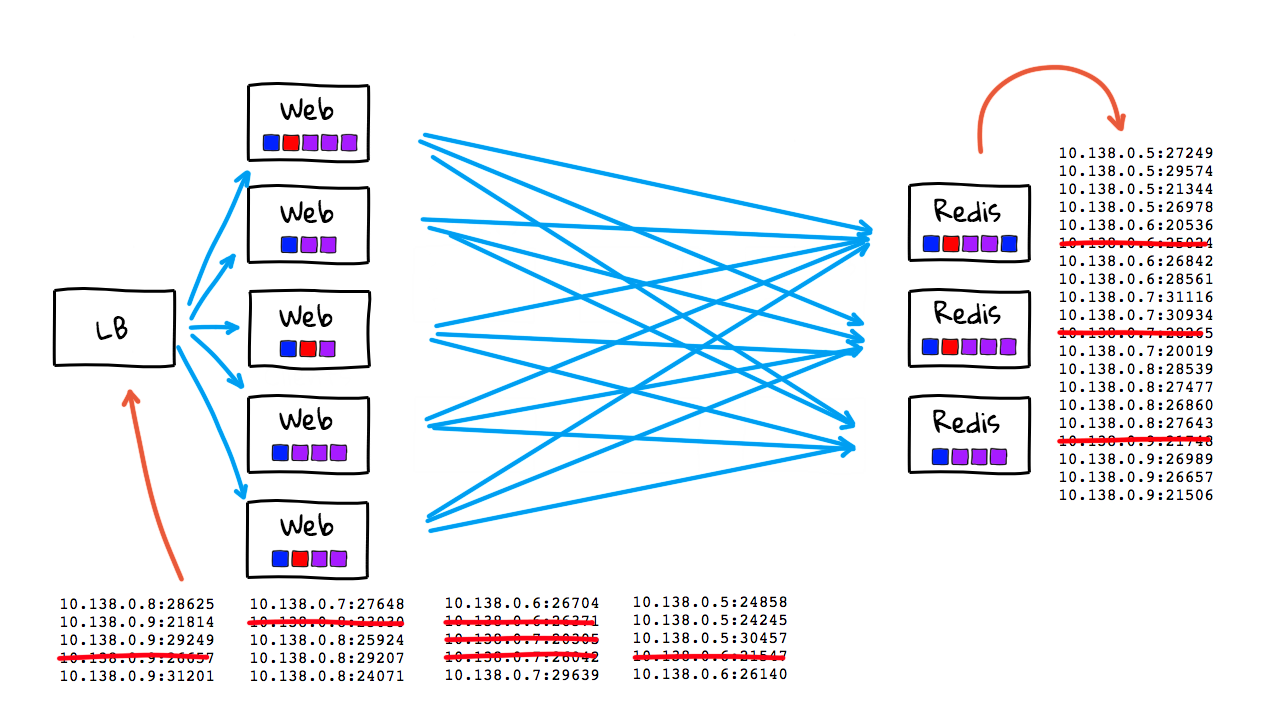
This use-case here, is where things totally fall apart if you are trying to hardcode address lists or use something like traditional DNS. Why though? Well, new instances could be spinning up and down every few seconds. If you are doing things manually, have things hardcoded, or if you have stale cached DNS records that are out of date kicking around, this is really going to be painful, if not impossible, to keep up with. Also, we have lots of random port numbers here. You can track this information in DNS SRV records but this is still not optimal. Also, it would be nice to track some metadata about these instances too, are they healthy, what cluster do they belong too, etc. So, this here, is where these more advanced Service Discovery come into play. I should mention. I am chatting about containers here, but this also totally applies to running things in auto scaling instances groups too, in that you will constantly have instances coming and going and need to keep track of them.
So, hopefully this sort of paints a picture of why you might want to explore this if you are running a bigger shop. So, I mentioned as things scale people will need something like this. I wanted to just show a few reference points that might put this into context. While I was doing research for this episode, I was checking through the Github pull requests for interesting bits. There is a pretty great thread in here, about a customer running multiple larger clusters. There is one comment about a cluster being 3400 nodes. So, you can sort imagine, how you totally need automation to handle the constant change with a server infrastructure of this scale. There was also comments from Hashicorp themself, about how they have thousands of larger scale customers, and rank their biggest Consul install at 36,000 nodes. So, this hopefully gives you a sense of who would use something like this.
So, if we flip back to the diagrams for the minute. This here, even seems really small scale when you compare it with many thousands of nodes running hundreds of different applications. So, Service Discovery, is the core concept of how do each of these applications or services, find the IP addresses, port numbers, and metadata of healthy instances they want to connect with.
Alright, so that is sort of service discovery 101. Now, lets head back to the Consul website and checkout the use-cases. So, Consul is a really useful tool when you are moving from a pretty small scale static environment to something like a Cloud environment where all the sudden things are much more dynamic. You might be using auto scalars, or containers, and instance counts can quickly change, so you need a tool to help keep track of things. Here’s the three core use-cases that Consul helps us solve. First, we have Service Discovery, this is how applications can find other applications they want to talk with. Next, you have this Configuration component here, this is where you can store key/value in Consul, that instances can ask for. I’ll cover this more in a second. Finally, we have this service-to-service tunneling feature. This is very much a Istio like feature, which we covered in episode 63, where you can configure your applications to tunnel traffic through a sidecar proxy. This allows you to enforce policy, grab monitoring, logging, and all types of metrics about who is talking to who on your network.
To get a handle on how this works, lets check out a few more diagrams, on how Concul actually works from a server architecture perspective. So, we have our two servers again, but this time we also have a Consul server sitting on the network. Typically, you would not just have one Consul server, but something like 3 to 5 servers, in a highly-available mode. Consul is a client server architecture. So, you will install a Consul agent on each of the machines in your infrastructure, then these clients will then be connecting into the Consul server infrastructure.
So, each of these agents after starting up, will connect out to the Consul cluster, and self register with it. Basically, saying, hey, I’m a web server, please add me to the web server service registry. Consul then starts tracking this node. Same goes for the Redis instance here, it connects, and self registers with the Consul. You can almost think of Consul like a database that is just tracking lists of healthy instances in your network.
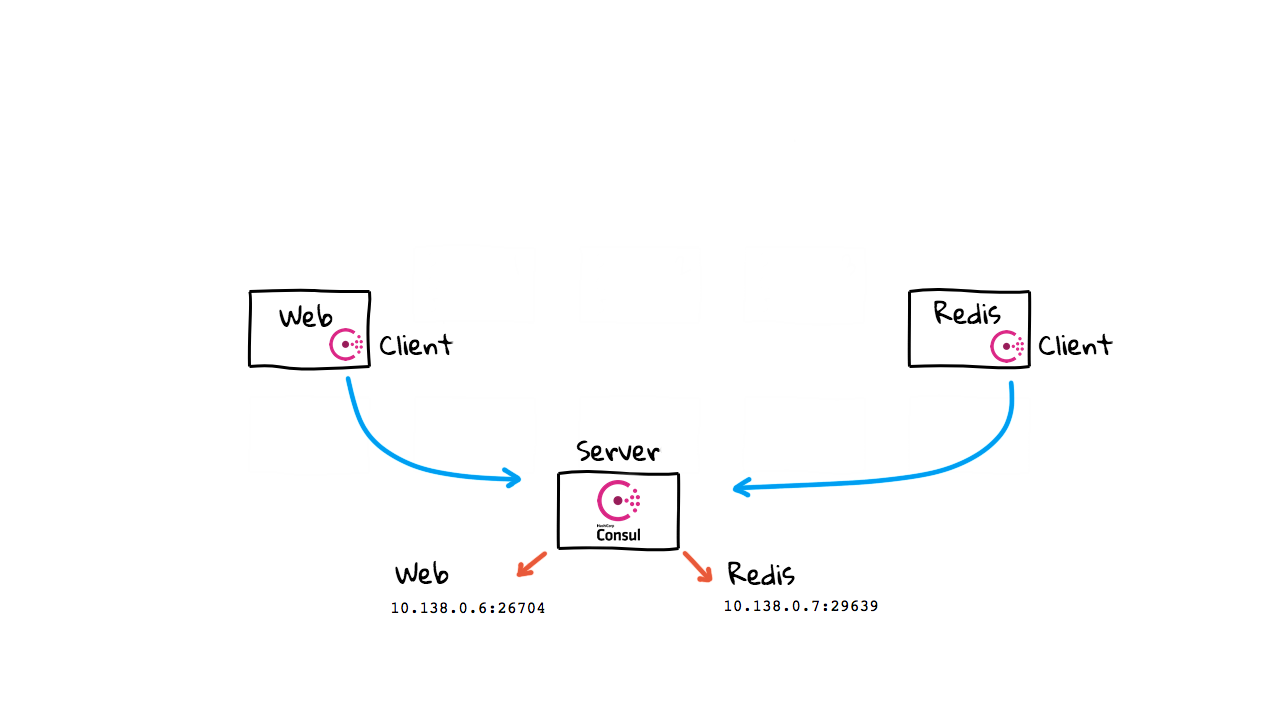
So, now when the web server wants to chat with the Redis instance, it makes a call out to the Consul cluster and ask for healthy instance in the Redis service listing. This is pretty much exactly how DNS might have worked, but Consul allows you to track instance health, IP address, port numbers, and lots of other metadata, about the service you want to connect to. So, this goes way beyond what something like DNS might offer. I’ve mentioned health a little bit here, how this works, is that each of these client agents will be continually checking in with the central Consul cluster. Consul will start to track the health of these instances, and if you ask for something, it will only return healthy instances. You can also define your own custom health checks too. Alright, so say things are growing now, and you add a few more Redis instances. You just boot them up, and they self register with the Consul cluster, without you needing to do anything. Consul just adds them to our instance lists and starts tracking their health information.
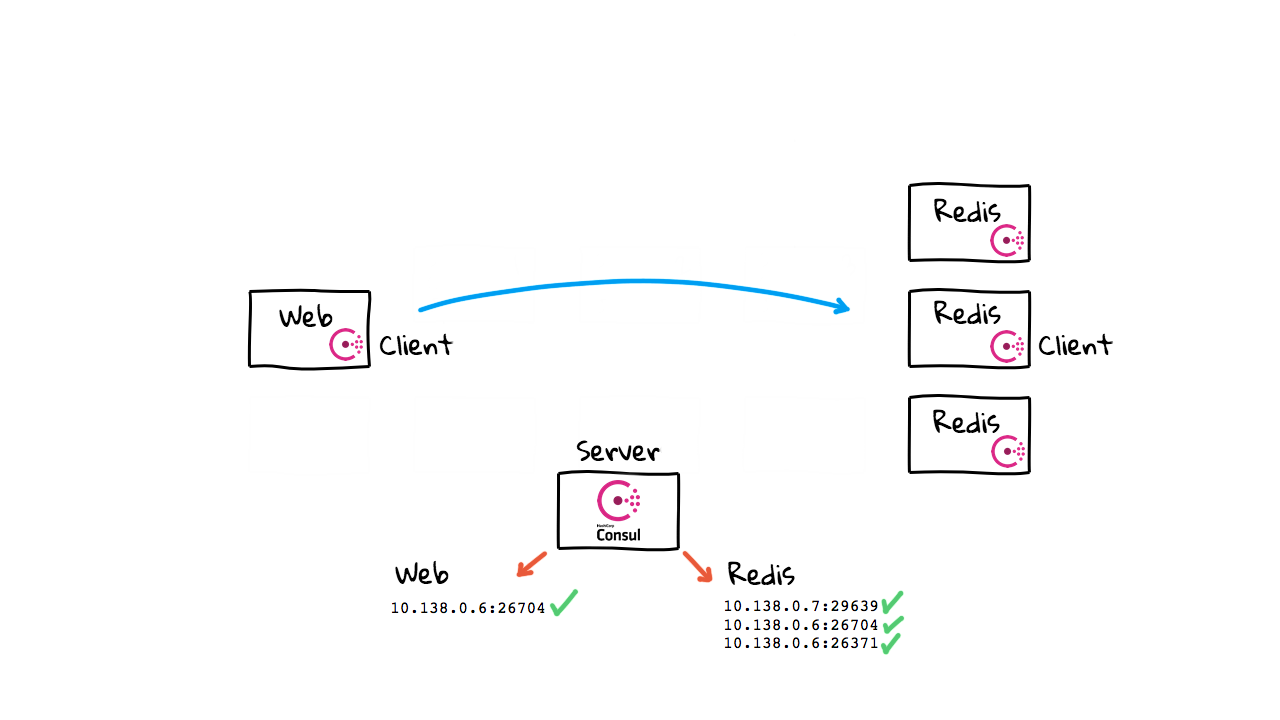
Then, when we want to connect again, we just ask Consul for the latest health instances in our pool and we have totally up to date information. You will notice, this is totally automatic too. In that, instance just boot and self register, so there is not much manually stuff happening here. So, what happens when a node fails? Well, the agent will likely stop checking in, or maybe a health check will fail, and Consul will remove it from the healthy instance list. Then, if we try and make a connection again, we will only be given a list of healthy instances. Sure, you could get into a situation, where things fail as you are talking to them.
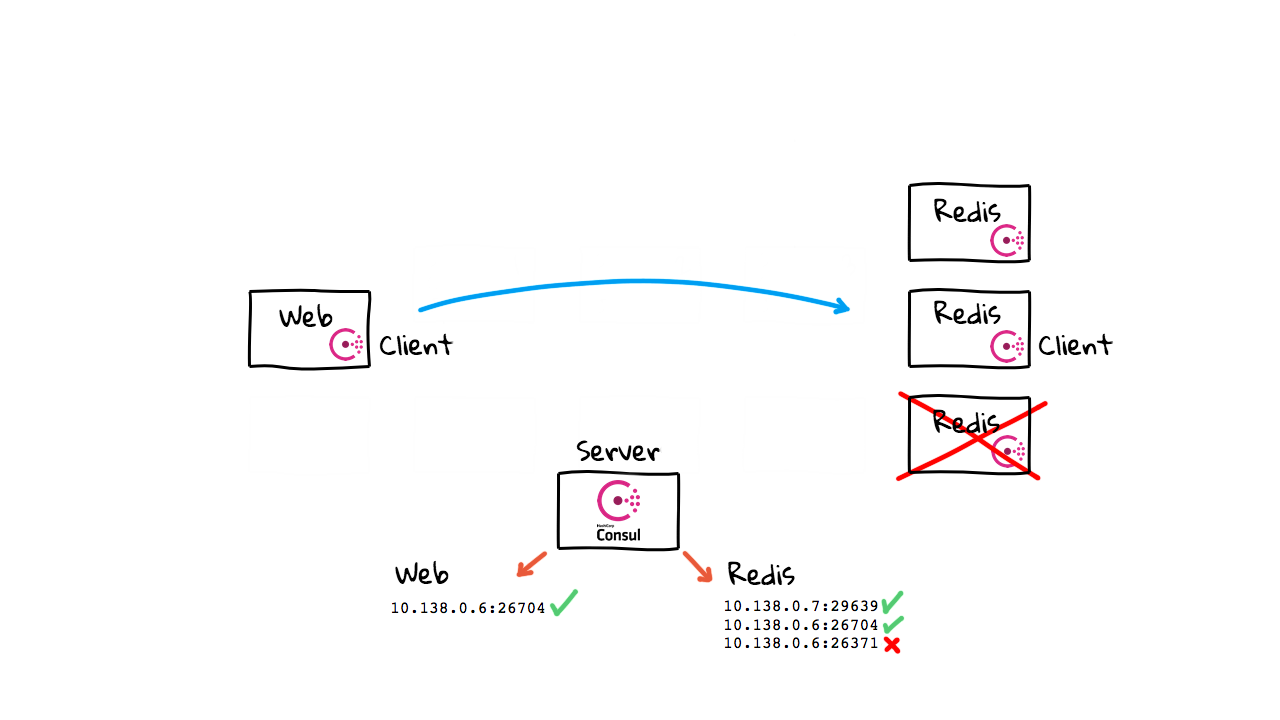
But, using Consul greatly decreases the chances of you connecting to an instance that doesn’t exist anymore or has failed for more than a few seconds. Even though this is a super simple diagram, as you has seen on the Github page thread, this works in practice with thousands of machines, and hundreds of applications. Also, this is why Consul needs to be in a highly-available mode, with pretty beefy dedicated instances. In that, this is pretty core infrastructure, if it goes down you are definitely going to notice as none of your infrastructure can lookup other healthy instances now.
Lets jump back to the website for a second. So, that covers the most common use-case here, this Service Discovery piece. But, what about this Service Configuration feature here? Well, since Consul has an agent sitting on each machine now, this sort of opens up new use-cases. Lets jump back to the diagrams and chat about that for a second. So, our Consul cluster, besides just handling lists of services and their state, can also act as a key/value store. You can store pretty much anything you want in here. Say for example, that you wanted to track Redis connection settings, like max clients, and a timeout configuration setting. So, we want to make our connection from the web server, over to Redis again. This time, we ask the Consul cluster for all healthy instances, like before, but we also check the key/value store for settings on how to connect.
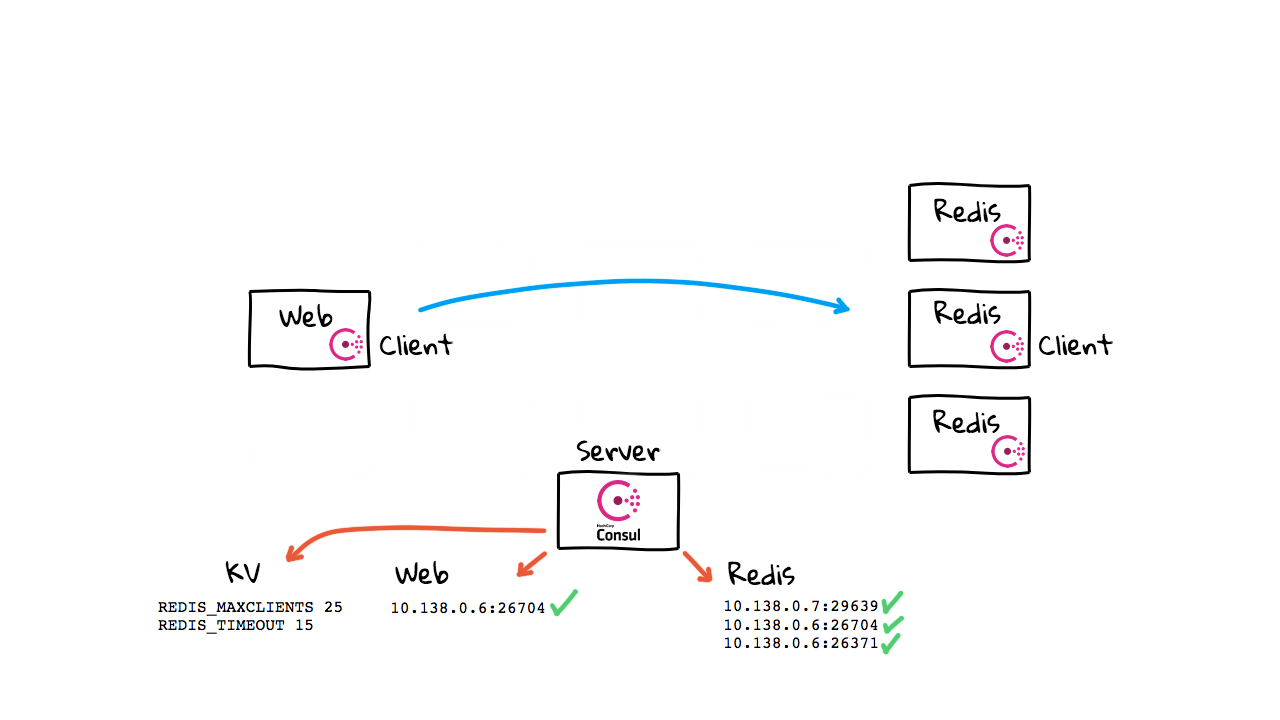
This is sort of a abstract concept in that this is just an example. Really, you can do anything you want with this key/value store. But, if you use Consul, this can sort of be your source of truth for specific configuration data that might need to change quickly. Maybe you don’t want to roll out, or redeploy lots of instances, just to push a simple config change out. So, this could be sort of a smart way of having client poll Consul for these settings. But, it is just a general feature and you can use it in any way you want. Alright, so we covered two main use-cases now, Service Registration and Discovery, along with the key/value store. Lets chat about the final use-case back on the website.
This last use-case, is this secure service-to-service tunneling feature, that is sort of like Istio but simpler. Again, since we have all these agents sitting around, maybe we could tunnel data through them too. Lets jump back to the diagrams. So, this last use-case is something called Consul Connect, where you can tunnel data through the Consul agent, sitting on each client machine. This is a pretty advanced feature that is still fairly new. I’m going to add this third category of state data, over here called, Intentions. Lets chat about how this works with Consul Connect. So far, we have just chatted about the use-case where our applications are talking directly with each other like you would expect. But, using this new Consul Connect feature, you can configure your applications to route traffic through the local Consul agent sitting on each client machine. From here, the agent then proxies that traffic to the destination agent, where it is finally passed to the intended recipient. I covered the logic around why you would want to do something like this in episode 63, on Istio, so if you are at all interested, I’d check that episode out for more context.
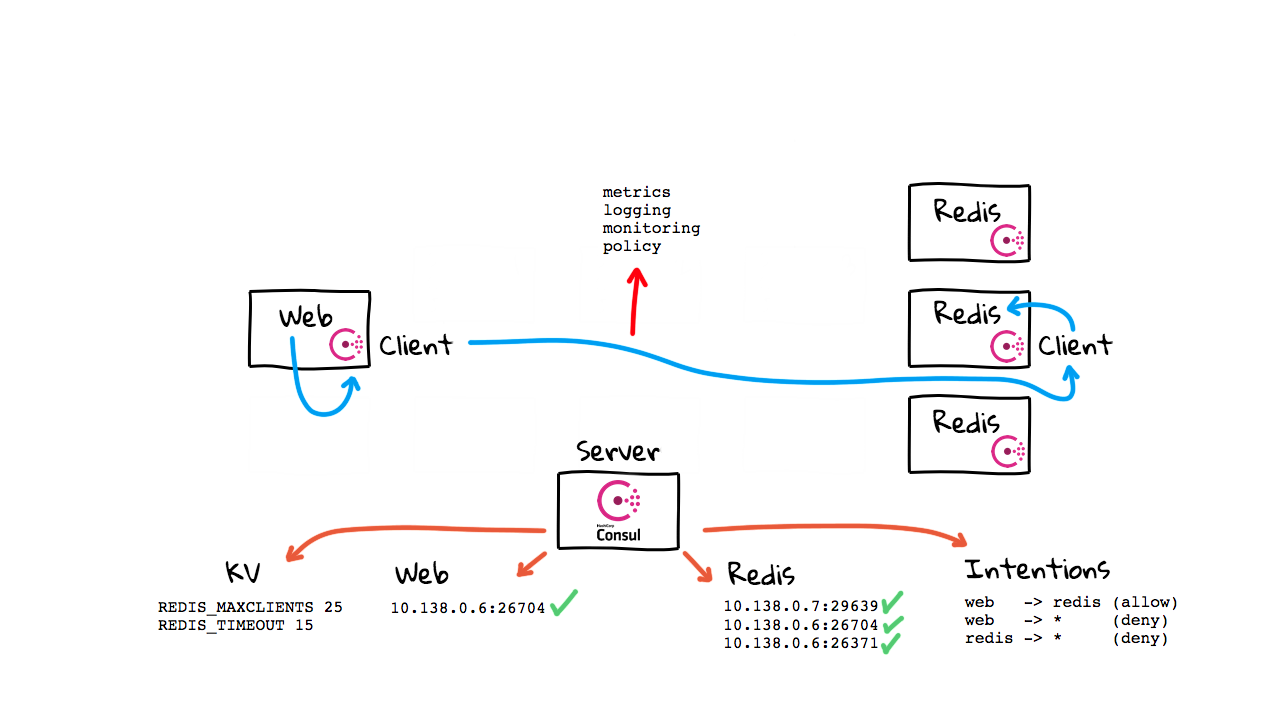
The high-level idea here though, is that you can now add policy enforcement through these Intention lists. You can say things like, only the web servers are allowed to talk with Redis, Redis cannot talk with anyone else, and the web servers cannot talk with anyone except Redis. This policy is checked when we want to make connections. You are paying a performance price for all this traffic tunneling. But, you now have totally visibility into who is talking with who, along with detailed metrics, logging, monitoring, and policy enforcement. By the way, this Consul Connect feature is not the default mode of operation, but you can turn it on, say if you wanted this added visibility. You could totally map out who is talking to who, in pretty much real-time. This might be really useful for security and auditing reasons.
Alright, lets jump back to the website for a minute. So, this is pretty much covers the common use-cases, the client server architecture, how service discovery and a service registry works, at a high-level. For the most part, if you are using a cloud provider today, this is mostly already happening for you under the hood. You just fire up your instances, say you want a load balancer, and it will do all this service discovery stuff for you behind the scenes. Same goes for Kubernetes, it is using etcd behind the scenes, and is transparently doing all this service discovery stuff for you. But, Consul is a tool that totally exposes this raw functionality for you, say if you wanted to roll your own or do something custom.
Alright, so that mostly covers the theory part of things. Lets jump into the demos. So, there is this Consul Deployment Guide that walks you through setting up an example cluster. I have already configured one but wanted to quickly walk you through this.
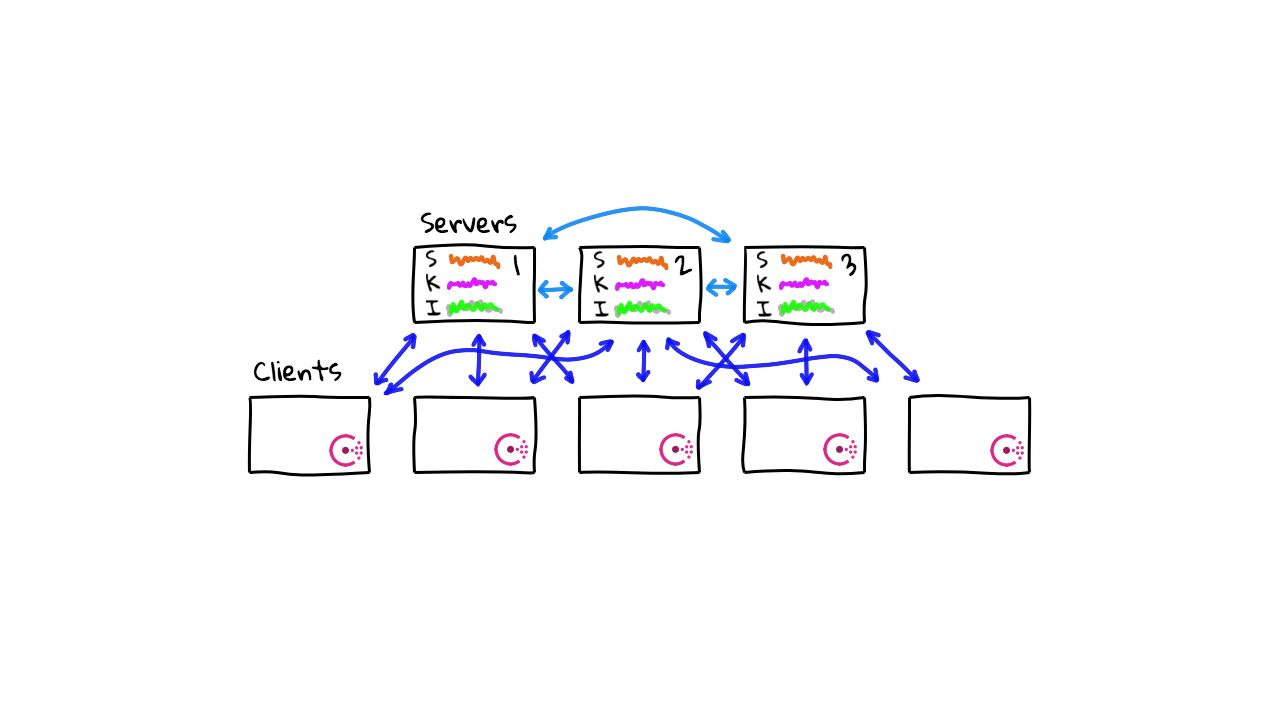
So, here is what a Consul client server architecture might look like. You have your three to five node Consul cluster down here, all sharing replication data (tracking things like instance lists, health data, key/value data, intentions, etc), then you have the client nodes up here. These client node could number in the thousands. The general steps for getting this running, are things like downloading Consul, installing it, configuring systemd, setting up the configuration files for either client or server mode, and then starting Consul. It is actually super simple, as Consul is only a single binary for both the client and server, and you just configure the settings via a configure file to specify the mode you want it to run in.
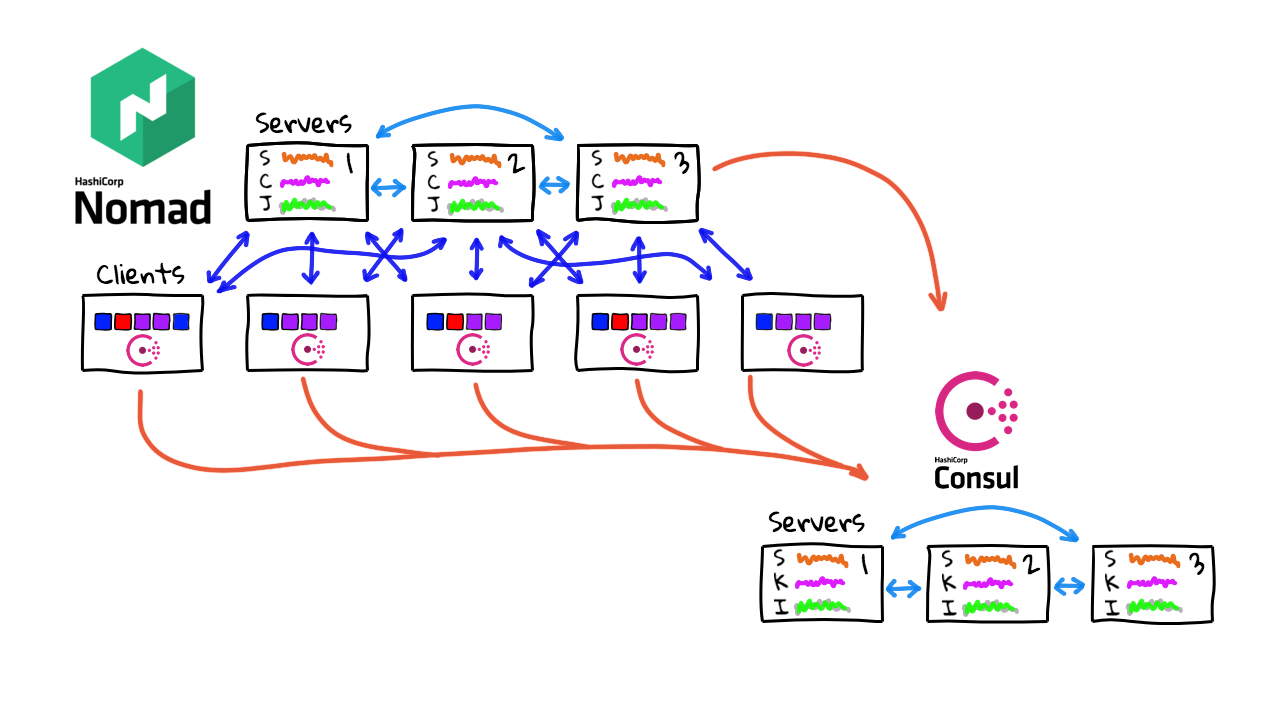
For the demo, I configure a fully functional 11 node lab environment, with a three node Consul cluster, and a bunch of client nodes sitting in a Nomad cluster (used for quickly spinning up Docker containers). All these Consul client agents are already installed and configured to feed data into our Consul cluster. I used that reference architecture guide and it went pretty quickly. One thing to note, is that you can see the architecture of Nomad and Consul server nodes looks very similar, that is because they are using exactly the same backend libraries for gossip protocols and leader election. This is super a battle tested server architecture, and sort of a hidden strength, that HashiCorp shares across its products. Basically, they can take trusted code from one project, and spin off a similar architecture for other projects.
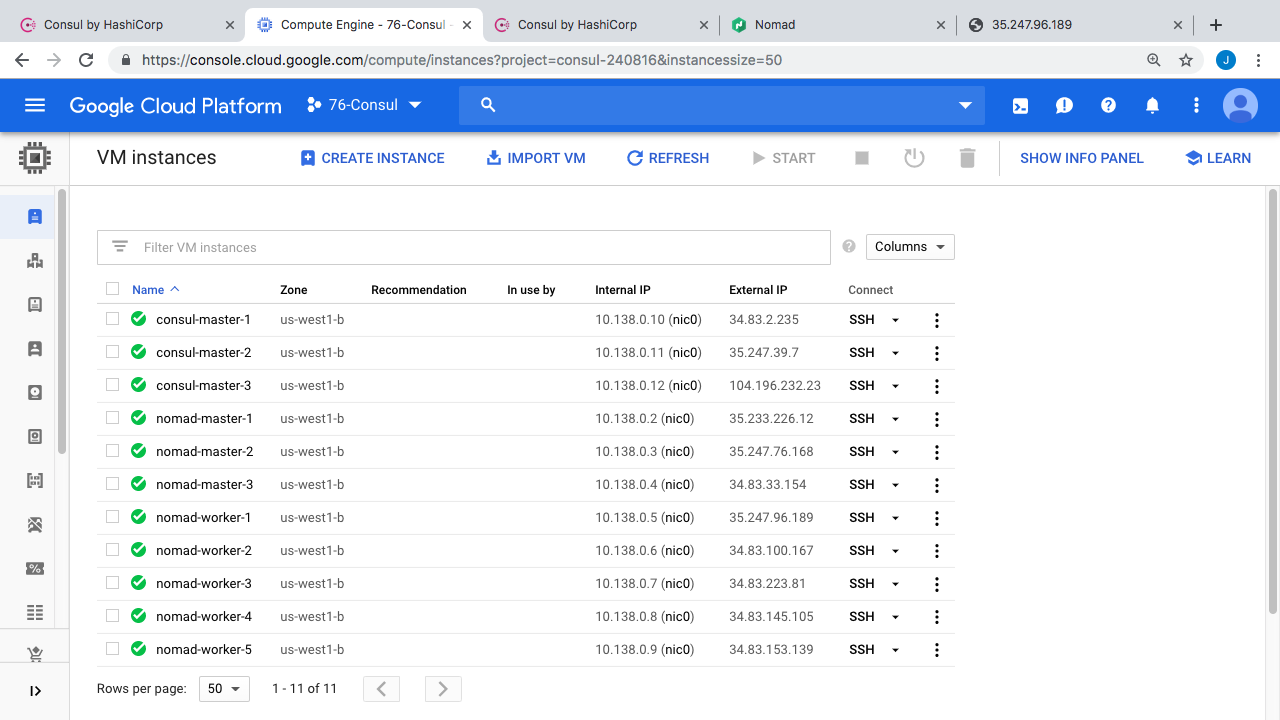
Alright, so if we jump over to the Google Cloud Console here, you can see our 11 virtual machines running. We have our three Consul server nodes here. Then, we have the Nomad cluster nodes, where we can spin up and down a lots of containers, and sort of test how Consul reacts to things. Nomad has 3 master nodes, and 5 worker nodes, where we are running the actual workloads. By the way, we chatted about Nomad, in episode #74, if you wanted a refresher. The idea here, is that we can use Nomad as a super simple tool for spinning up lots of Docker containers across a multiple worker machines, to test scaling things. I thought it might work as a cool demo.
So, you can connect to Consul via a command line client, through an HTTP API, and also through a web interface. Here’s what the web interface looks like for this already configured setup. You have a page listing all the services Consul is tracking and their current health status. So, you can see our Consul cluster, the Nomad master nodes, the Nomad worker nodes, a Redis example application running in some containers, along with an example web application also running in some containers.
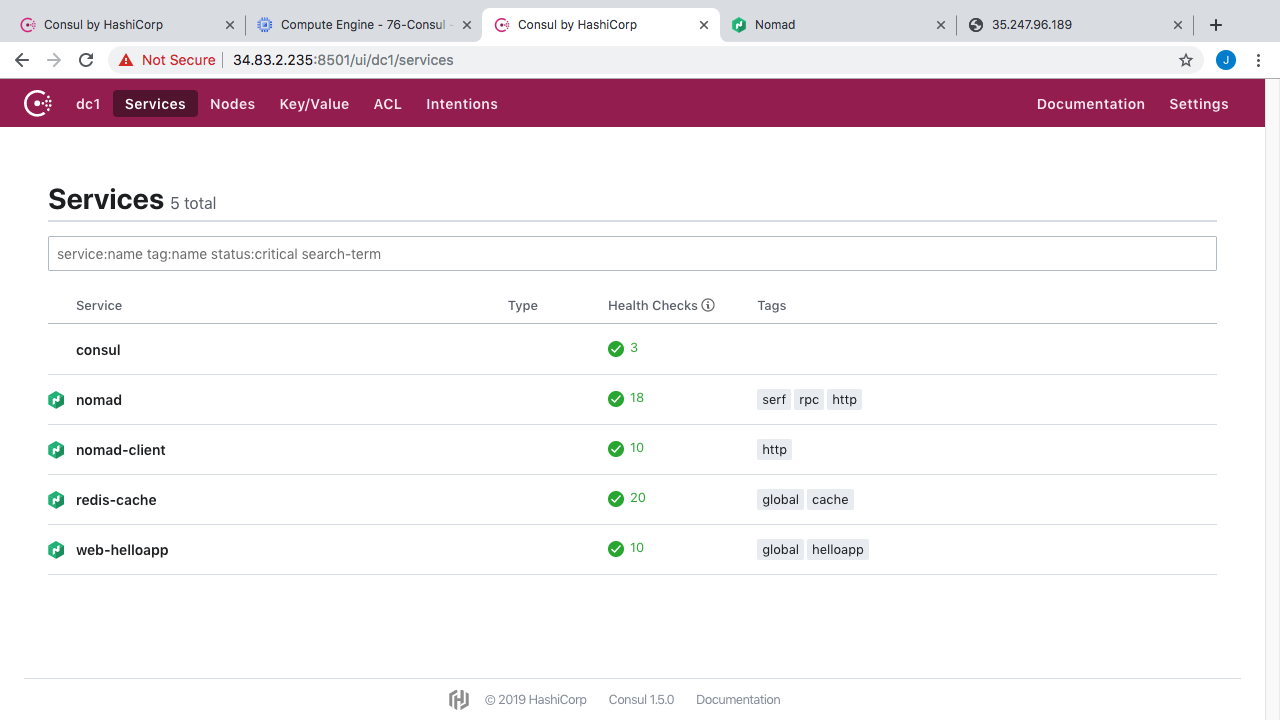
Lets check out the Redis service listing here. Oh yeah, you will also notice these tags over here, in addition to tracking things like IP address, port number, health, we can also track tons of metadata about instances. So, in your client agent config you can add tags to things, maybe you wanted to application track version numbers, whether this is a dev/test/prod environment, maybe track data center locations, or pretty much anything like that. Then, when you want to do a Consul instance lookup, you can also filter based off these tags. This is a super cool feature especially when you have lots of instances. Alright, so in here, you can see all our Redis cache container instances running in our Nomad cluster.
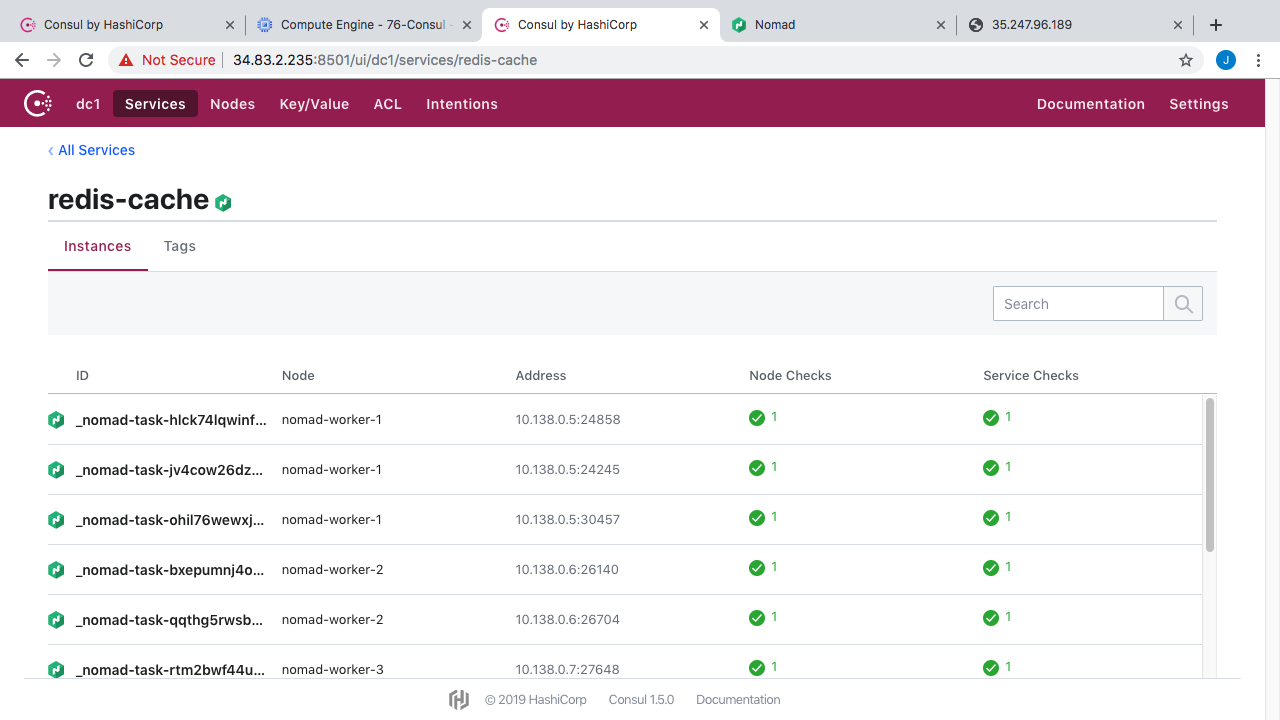
You can see what node each instance is running on, the IP address, and port information, along with the health checks. If we click into this health check here you can see it is doing a simple TCP connection to make sure it is successful.
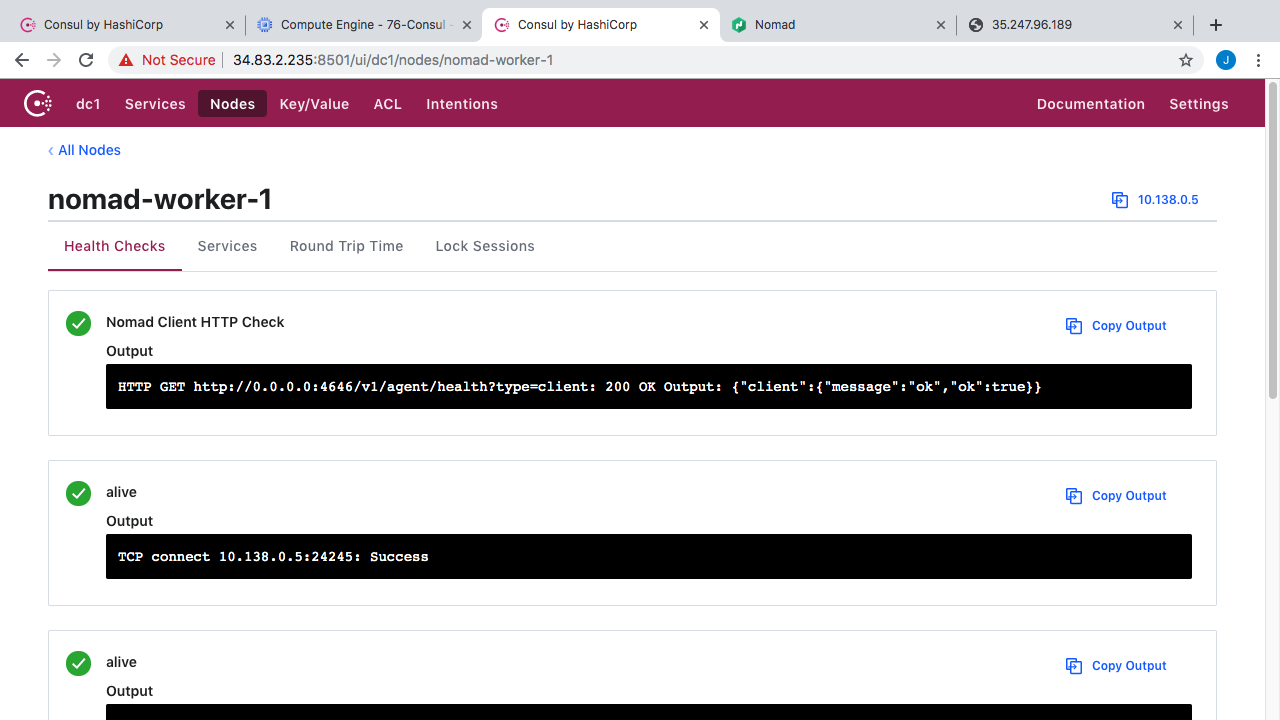
But, you can totally configure how these work too. Alright, so that is sort of the service tab. What about nodes? Well, Consul is tracking health of all the agents running out on our virtual machines. So, we have 11 virtual machines running in our demo environment, with 11 agents installed, and you can see all their health data here.
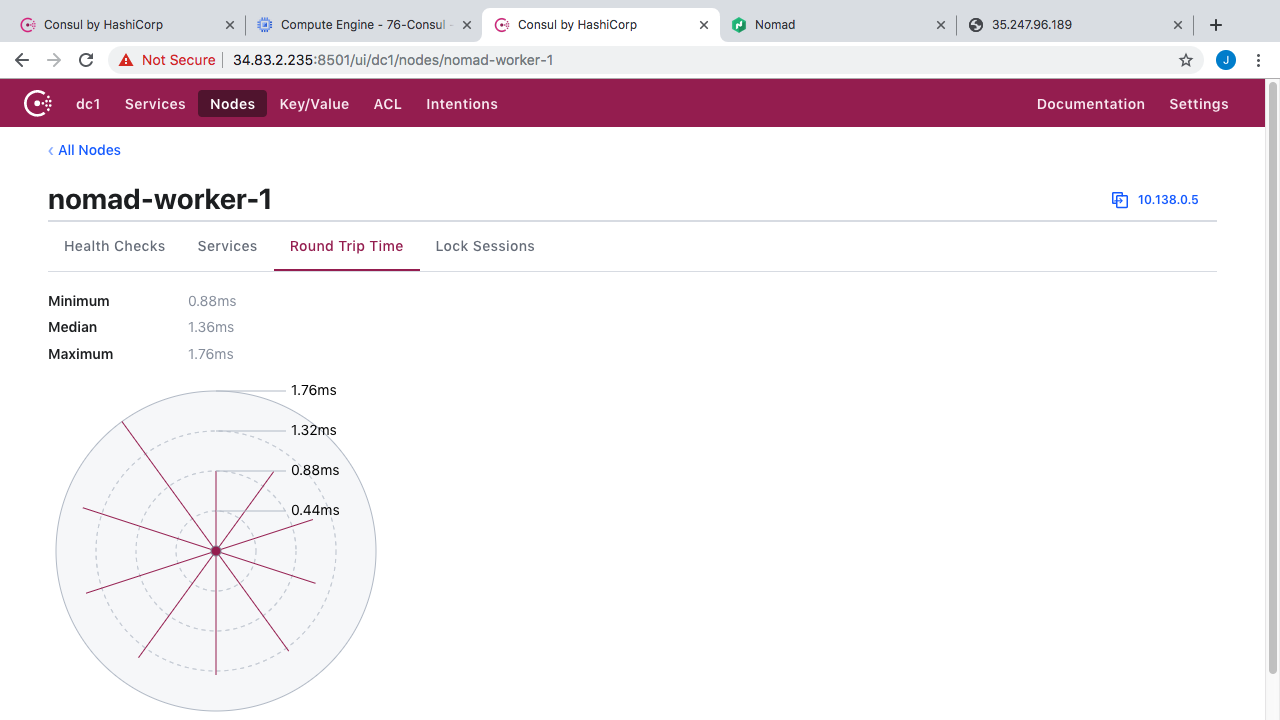
You can also click into these and get a summary of all service running on a node and their health. Lets pick worker one here. So, you can see all the health checks and all that. If we click over to services, you can see we have a nomad client, a few Redis instances, and a web instance. So, this is sort of cool if you needed to debug something and wanted to check the health status.
Next, lets check out the key/value tab. This is where you can store pretty much any key/value data you wanted to expose to clients. All they need to do a make a connection and ask for it. You can see I added a few example Redis keys here.
The next tab here, in for access controls. You can configure all types of policy around what client agents have access to, and just generally what they can do. Basically, who can define policy around who can connect, add, update, list, and delete things. Finally, we have that intentions tab here, this is for that advanced Consul Connect feature where we can tunnel traffic through the Consul agents. So, this is where you can define policy rules for traffic routes if you enable that tunneling functionality. I am not using it right now but just added some example rules here to show you what that might look like.
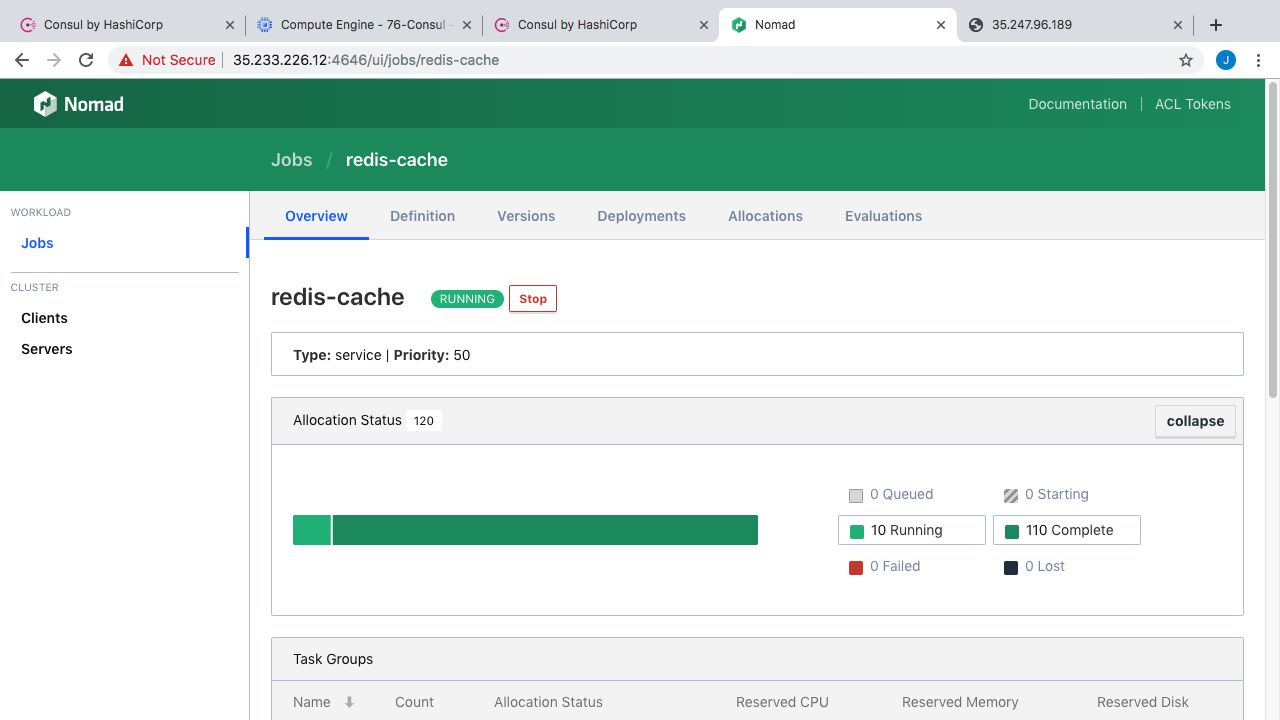
Before we jump to the command line. Let me just quickly show you what the Nomad cluster web interface looks like too. So, as we already chatted about, we have 3 Nomad server nodes tracking cluster state, then we have 5 worker nodes where our containers are actually running. I have also fired up two example applications that sort of mirror our diagrams from earlier. So, we have a bunch Redis instances here, there are 10 running right now. Then, we have an example web application with 5 instances running of that.
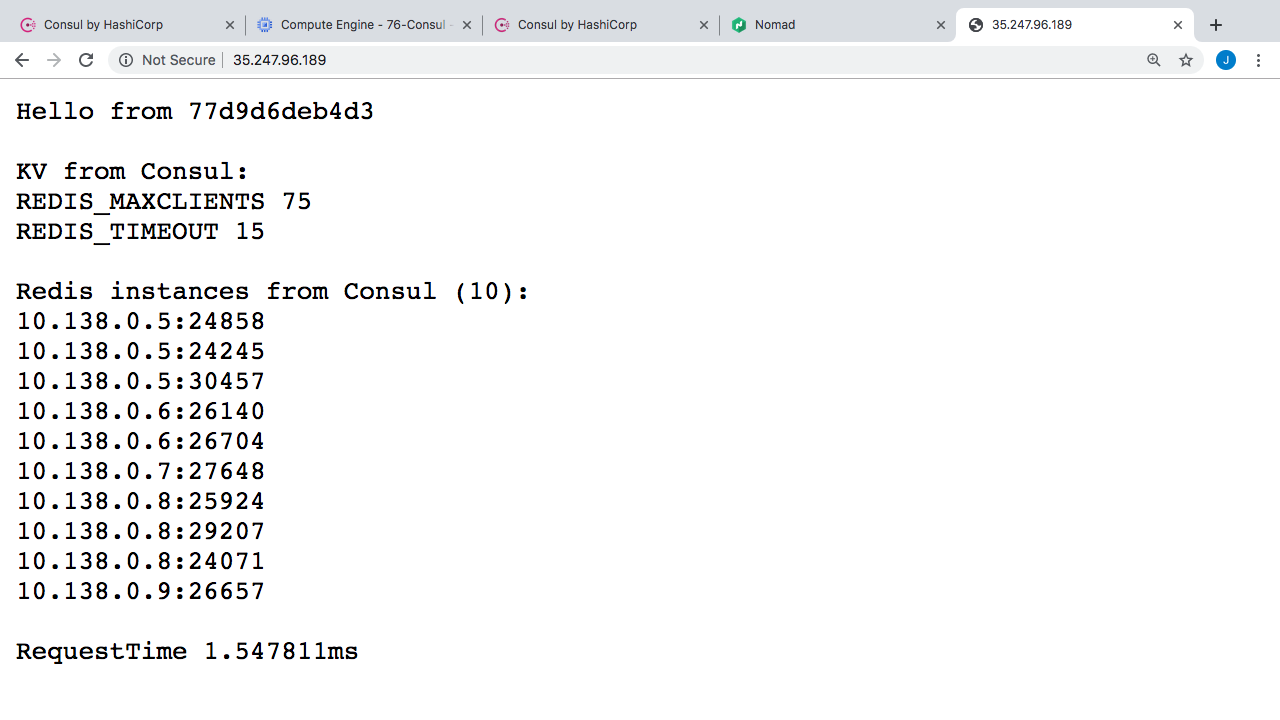
Hello from 77d9d6deb4d3

KV from Consul:
REDIS_MAXCLIENTS 25
REDIS_TIMEOUT 15

Redis instances from Consul (10):
10.138.0.5:24858
10.138.0.5:24245
10.138.0.5:30457
10.138.0.6:26140
10.138.0.6:26704
10.138.0.7:27648
10.138.0.8:25924
10.138.0.8:29207
10.138.0.8:24071
10.138.0.9:26657

RequestTime 1.547811ms
Here’s what the example web application looks like. So, up here, we are showing the hostname of the container that is serving this instance. You can see if I refresh this page that hostname changes sort of showing that we load balancing across container instances here. Next, here we are connecting to Consul on the fly, and pulling key value data for our config data. This matches the values we entered over in the Consul cluster. Actually, let me just change one of these and then we can reload the web server to verify it is working. Alright, so if we reload this here, the value should change from 25 to 75. Easy enough right. Down here, we are also polling Consul for a listing of healthy Redis instances. So, you can see 10 instances here.
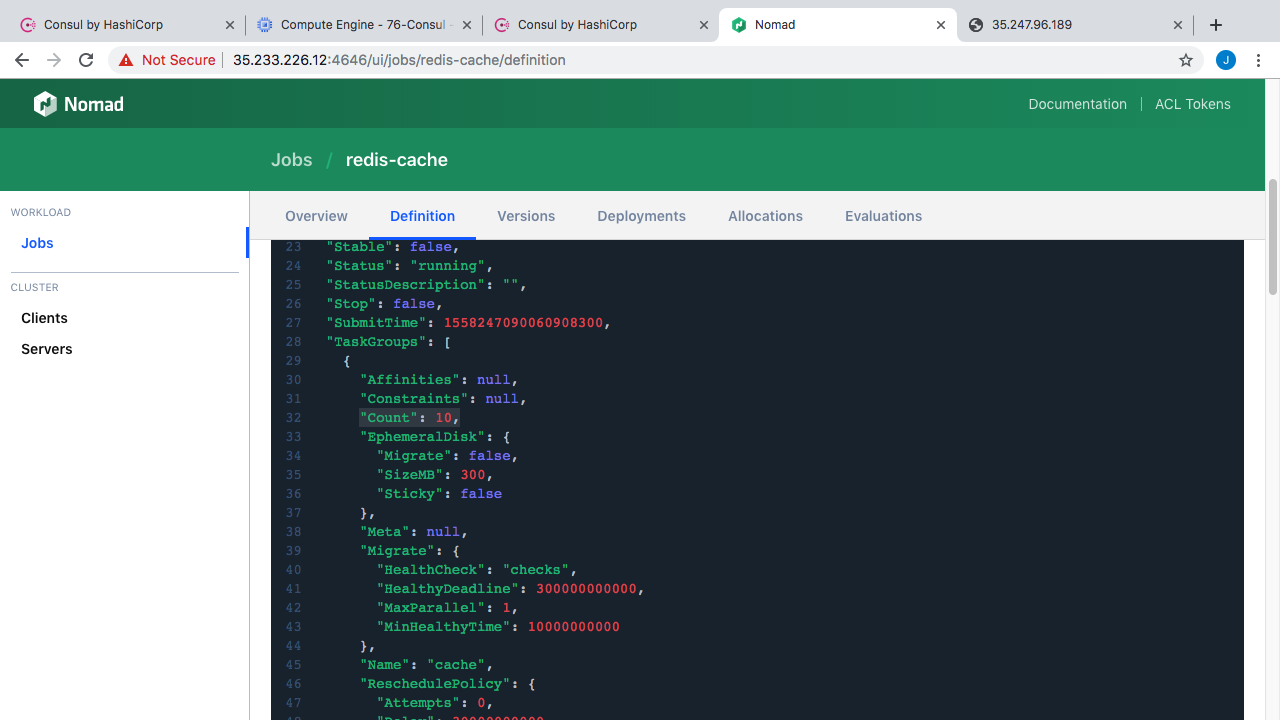
Lets jump over to Nomad and change this instance count and see what that looks like. So, I’m just going to edit the Redis cache workload here. Lets change the definition from running something like 10 instances to 40 instances. Lets save it. You can see here Nomad will tell us what the change will look like. This is pretty cool and useful for telling how things will change. Alright, lets run that. Now, lets flip back to our web application and start hitting refresh here. We should start to see the Redis instance list climbing here as our nodes are coming on-line. Pretty cool right. These containers are coming online and self registering with the Consul cluster and then we can just run a little query to find all the healthy instances. Now, lets scale this back down to something like 10 instances. Then save our changes. If we reload this page again you can see the list was downsized really quickly. So, this is what service registration and service discovery looks like with Consul.
By the way, you can check out the sample web application over on my github. Honestly, there is not much to it. I’m just grabbing the key/value data and then asking for any healthy services in the redis-cache list, with the tag global. Then, printing all this out.
Oh yeah, you are probably wondering how the self registration works with these containers. Well, lets quickly check out the job definition over on Nomad. Nomad has a section here, where you can define the steps to self register with Consul, all you need to do is define this Services block, give the service name, some tags, and then define the health check you want. Easy enough and it works seamlessly with Consul. There is lots of tutorials out there for getting this working with Kubernetes, virtual machines, and all types of other stuff too. So, if you have a use-case, changes are someone has already done it.
# The "service" stanza instructs Nomad to register this task as a service
# in the service discovery engine, which is currently Consul. This will
# make the service addressable after Nomad has placed it on a host and
# port.
#
# For more information and examples on the "service" stanza, please see
# the online documentation at:
#
#     https://www.nomadproject.io/docs/job-specification/service.html
#
service {
 name = "redis-cache"
 tags = ["global", "cache"]
 port = "db"
 check {
   name     = "alive"
   type     = "tcp"
   interval = "10s"
   timeout  = "2s"
 }
}
This episode is already really long and I wanted to add some command line bits in here. So, I am going to create a second episode on this topic and just focus on the command line stuff of how you connect with Consul. This is coming shortly. Also, if you are looking for more information, there is some awesome on-line videos of the last HashiConf where they walk through lots of the latest features and stuff like that. This is across all their products too. There is tons of useful information in here if you are using any of these.
Finally, I wanted to point out this learning site that HashiCorp has. They define all the products here, so you just pick what you are interested in, lets choose Consul. From here, you can choose a bunch of different on-line learning labs that walk you through the basics all that way to super advanced stuff. So, this is a great place to find more hand on information if you wanted to check this out.
Alright, thanks for watching and hopefully you found this useful. I’ll see you next week. Bye.