- Phonic Tonic
- #65 - Phonic Tonic - Proof of Concept (1⁄3)
- jweissig/phonictonic | Github
- Containers In Production Map
This is the second episode, in a three part episode series, where we are building an end-to-end, state of the art, audio to text transcription service. In the first episode, we covered the core idea, and the current state of the audio to text transcription market. In this episode, we will be building out the Phonic Tonic website, along with the backend infrastructure. We’ll chat about how the production architecture works, following how requests flow through it, and you’ll get all the code too. Finally, in the third and final episode, we’ll be checking out a launch checklist, exploring payment options, and working our way towards a well polished minimum viable product.
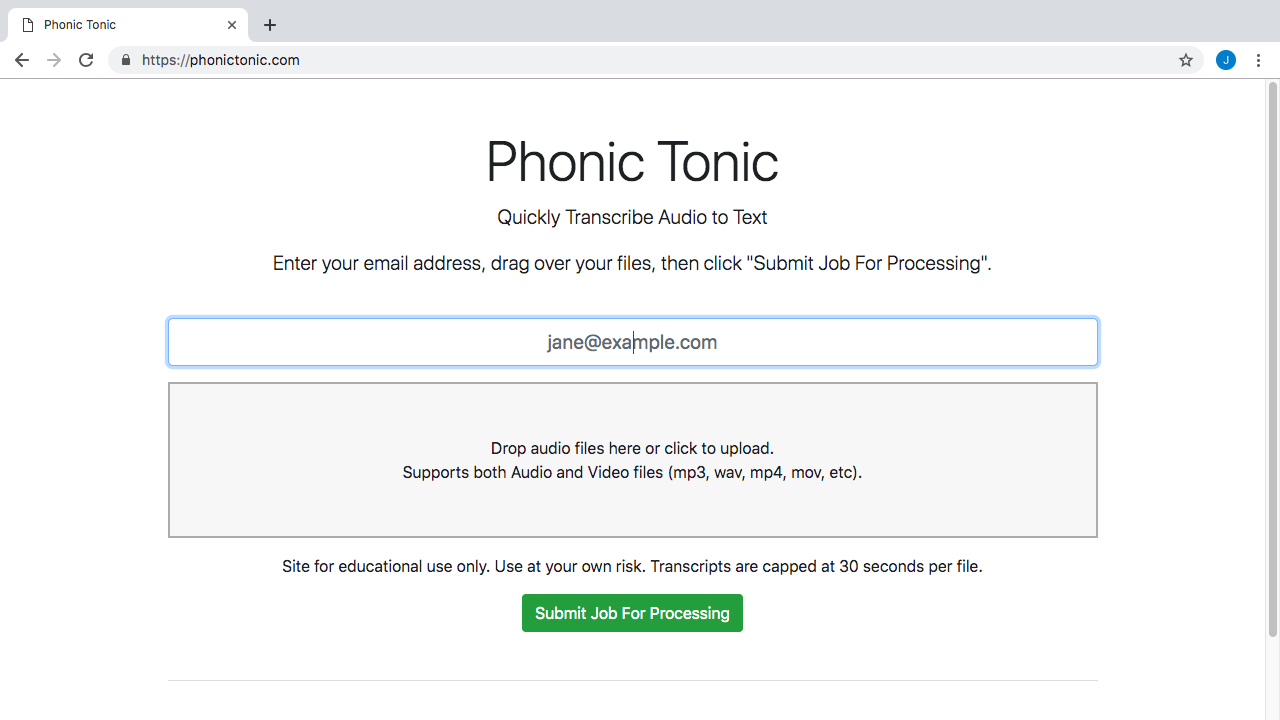
Alright, so I have already create the Phonic Tonic website and it is live. You can check it out too by visiting https://phonictonic.com/. Basically, you just enter your email, drag and drop your audio files, then click submit. Behind the scenes, we are probing the uploaded files to make sure there is actually an audio track, transcoding the audio files into an accepted format for transcription, and finally, transcribing the files into a human readable text format.
In the future, there will probably be some type of cost estimation and payment page after you click submit. But, for right now, I am just showing you and itemized list of the files you uploaded, and you can view the transcribed text once it’s ready, via this view transcription link. Pretty neat right. For now, I am only transcribing the first 30 seconds of any files that get uploaded. Just because, since this is costing real money on my end, I wanted to limit things for now.
I mentioned you’ll get all the code for how this thing actually works. Well, I just posted it on my github page, and you can browse through it, if you’re interested. You’ll find the web service, the transcoding worker, the transcribe worker, and the email notifier worker code.
So, in here you’ll find all the dockerfiles, the cloudbuild.yaml files for automated deployments, along with the kubernetes yaml files that describe how things should be deployed initially. I’d recommend watching, episode #56 on Kubernetes, episode #58 on Simple Deployment Pipelines, and episode #59 on RabbitMQ. As they all, offer lots of supporting ideas and information for this episode series. This code is still very rough. It was sort of hard for me to post this, as I really like to have things super polished, but the reality is that most startups actually look something like this. In fact, you’d probably be shocked at what many enterprise companies look like too. Things are barely running behind the scenes, there are tons of things that need fixing, and there is lots of work required on the sysadmin / devops staff to get it into a stable and production ready state. So, it sort of fits the theme we’re going with.
Down here, I listed a few issues that need fixing. I intentionally did a bunch of bad things in the code that you will likely run into in your daily work too. Things like hardcoding usernames, passwords, IP addresses, storage buckets, and project names. Don’t worry, none of these are active, they are just for show. There is also no logging, monitoring, or alerting configured. So, what I was thinking, is that we create a few additional episodes over the next few weeks and actually work through correcting these rough spots.
Lets jump over to the container ecosystem map for a second. So, we have covered a few topics here already, but two major areas we have not chatted about yet, are logging and monitoring. So, this sets us up to do a few episodes where we instrument this application with things like metric monitoring using Prometheus and Grafana, application logging with ELK, and lots of alerting for when things go wrong. I wanted to create a few dashboards too. The cool thing here, is that we actually have a real life application to work with, and you get a peek behind the scenes, and full access to everything. So, it should be a really good learning tool. This sort of puts you in the shoes, of someone starting at a new company, where they have literally nothing but the app coded. We’ll need to configure all the supporting devops systems around it.
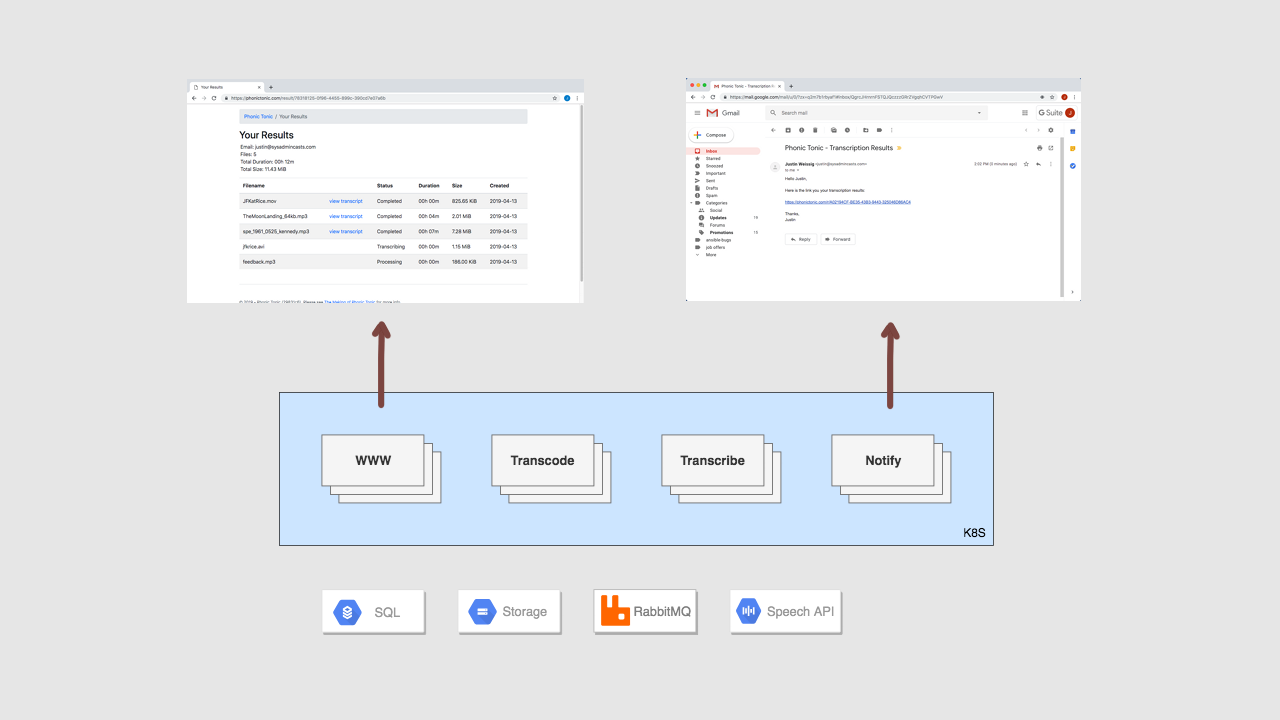
Alright, so you have seen a live demo, you now have access to the code, and we have a pretty good idea of what needs to be improved down the road. So, lets walk through how this application actually works behind the scenes. Lets flip over to some diagrams and go through it step-by-step. It has been my experience, that sysadmins and devops folks are typically not coding the customer facing apps or anything like that, but we are heavily responsible for making them run smoothly and hitting uptime targets. So, lets get a general sense of how this thing works under the hood, without going too heavy into the code.
So, a user shows up at our website hitting our web service, they enter their email, and upload their files. We are flushing all this data into a SQL database for job tracking, uploading the audio files to cloud storage, and then we submit a bunch of tasks into a queue for processing.
This might actually be a good time to review how the supporting infrastructure is configured. So, we have the phonictonic.com website here, where you enter your email, and upload your files. There is also an admin area here, this can be useful for checking if jobs were actually submitted, and things like that. This is disabled on the live version. All this is running on a Kubernetes instance, called phonic-test, running on Google Cloud. We covered this in episode #56. Then, under the workloads tab, we have our four services. The web service, the transcode worker, the transcribe worker, and finally the notify worker. I have also shut off all these workers, so that we can gradually enable them, and watch how things flow through the queues as these workers action them. If, I just enabled them all, jobs would execute too quick for us to track them step by step through the process.
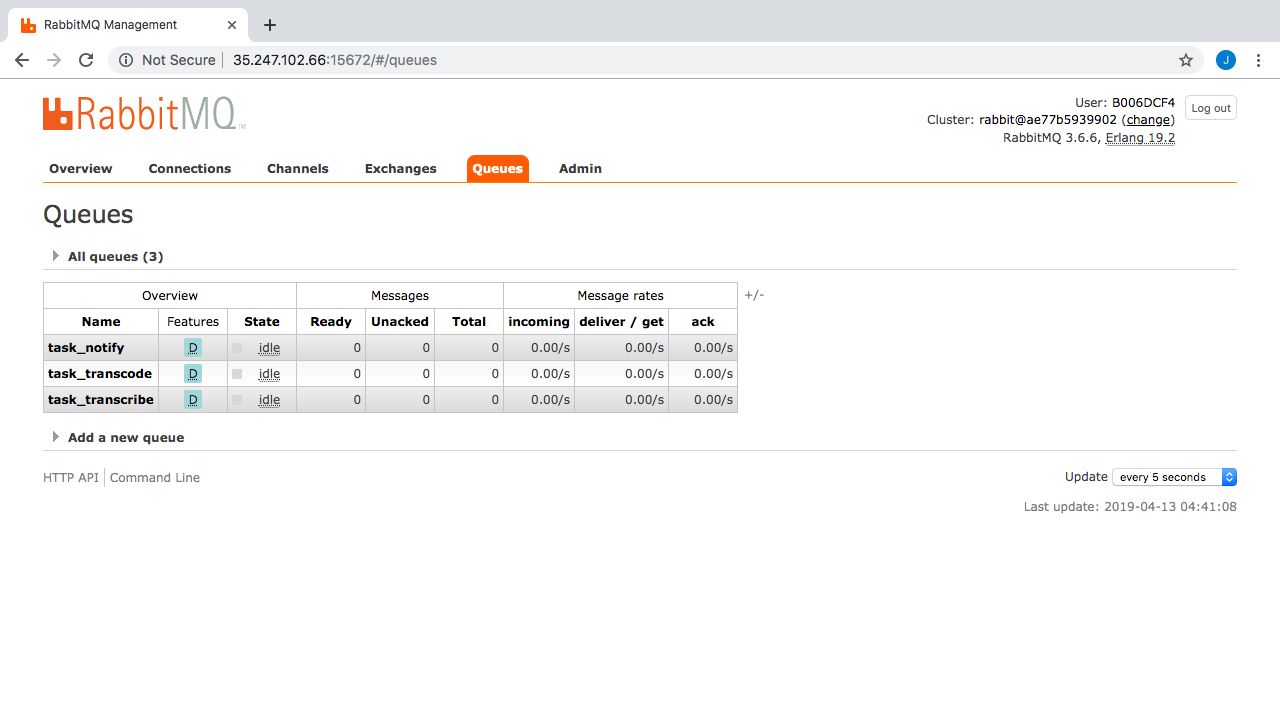
Talking about queues, I have a RabbitMQ server running too. You might want to watch episode #59 as a refresher on that. So, we have our kubernetes compute instances here. By the way, I have manually installed RabbitMQ. I was thinking, that is might be a cool episode to take some sort of instance and migrate it into a kubernetes cluster. So, we’ll look at that in a future episode too. Here’s what the Rabbit admin interface looks like. You can see there are no tasks in the queues right now. But, if we click over to the queues tab, you can see our queues defined here. Also, once we upload some example audio files, you will see these get populated, and flow from queue to queue.
Next up, we have a storage bucket, where we’ll store all the raw and transcoded audio files. This is sort of a staging area, where the web service can upload things, and the transcoder can process them, etc. Lets just refresh to show there is nothing in here. Again, this will get populated down here with our audio files, when we upload something in just a minute.
Next, we have our MySQL server. This is running as a managed instance, just because it is nice to have someone else look after it for you. You don’t have to worry about all the replication, scheduling backups, etc. But, it costs extra money for sure.
Here’s what the databases table schema looks like. There is a jobs table here, for tracking the high level user jobs and what emails they belong too. This is pretty hacked together for now, but will get flushed out down the road. Next, we have this tasks table. This is where I am tracking things like, filename, status, size, audio length, and the resulting transcript.
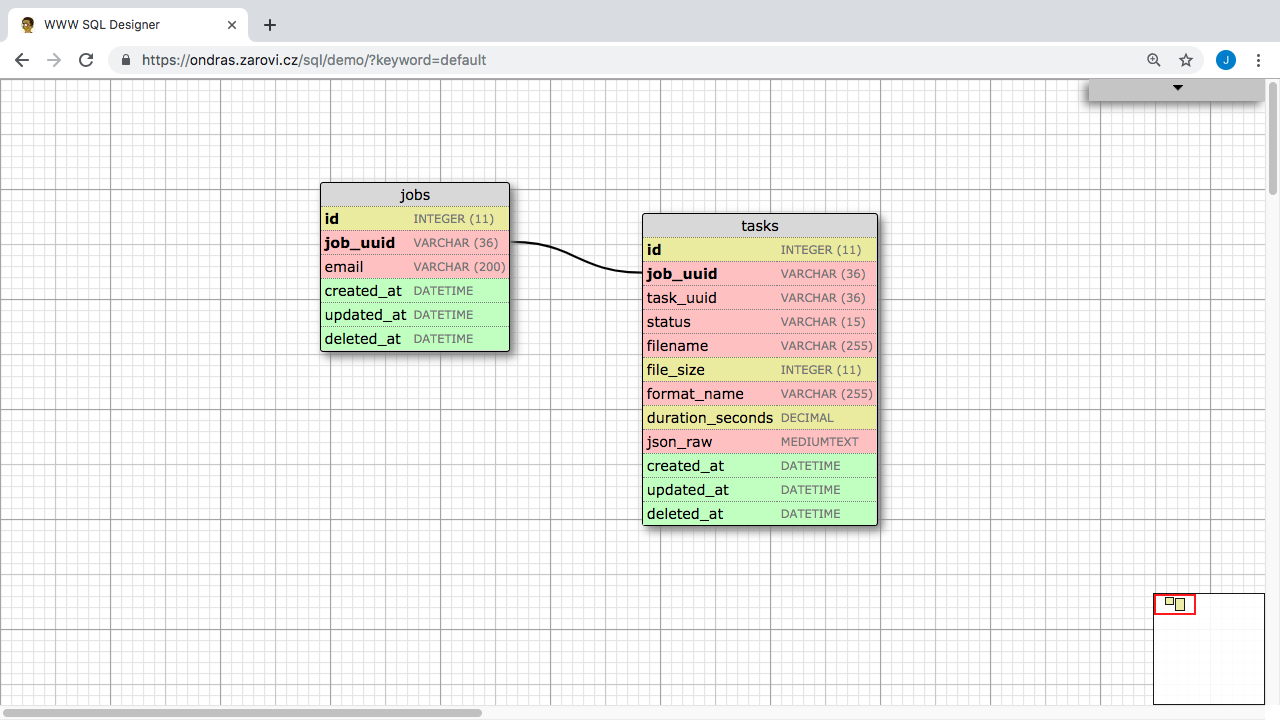
My method for creating a database schema is to simply write down on paper what data a user is going to input into our application, so things like email, but also all the metadata about the files they are going to upload. So, we need to track filename, size, etc. It sounds so simple, but this gives you a really good starting point. I typically write this on sticky notes, and then sort of group similar information together, and that gets you sort of a early table schema. But, it sort of doesn’t show here, as this is pretty easy, as we’re not tracking lots of data.
Next up, we have our source code repos, along with the build triggers. You should totally check out episode 58, on simple deployment pipelines, if you haven’t seen that already. Using this setup, allows me to deploy code changes, for each of these app, in around a minute.
So, that is the super quick tour of what the backing infrastructure of phonictonic.com looks like. Using this type of worker queue system will allow us lots of operation scalability options, in that we can scale each piece on its own. Using containers and kubernetes really allows us to offload the complexity of all this too. We can also easily scale up and down our worker counts too.
Alright, lets jump back to that diagram for a second. So, lets try and get the system into this state here, where we upload a few files, to get data into the database, audio files stored in the storage bucket, and a few tasks into the Rabbit queues.
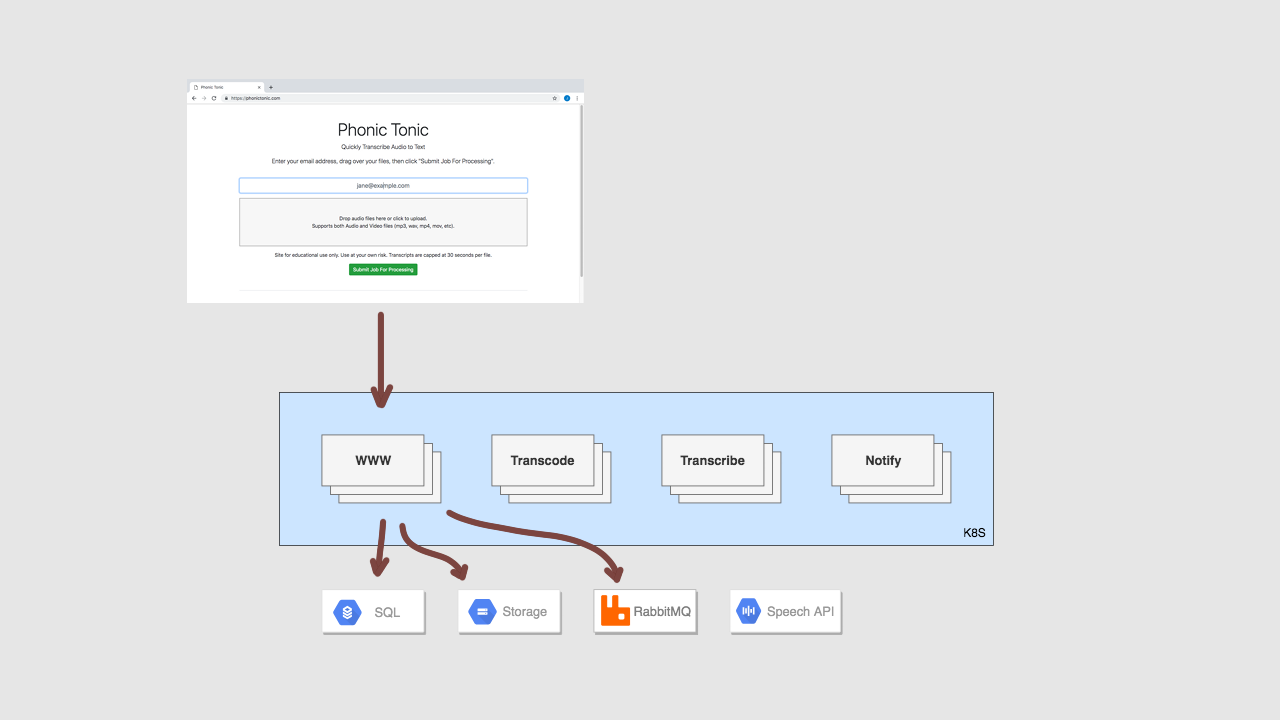
Lets, go back to the website. I’ll enter my email here. Then, I am going to click in here and upload a few files. I just search around for example mp3 files on-line and there is lots if you are looking for examples to try. Alright, so we have our files uploaded, lets submit the job.
You can see we get the itemized job results page. This is pulling data from the database about the job and all files we submitted. But, you can see things are stuck in the processing state here, and that’s because, we don’t have any of those backend workers running yet.
Lets check the admin interface and see if our job appears there. You, you can see we have our 3 files here, and lets click into it for details. Just a heads up, I like using random unique identifiers for things like this, as I typically don’t like trusting user data for storing things like file names. Having an admin interface like this will help us debug things as they flow through the system too.
Now, lets check RabbitMQ. Great, you can see our three tasks sitting in the transcode queue. They are waiting here because there is no worker online to process them. I mentioned before, that these cloud transcription services are super picky about what formats of audio they accept. So, say for example you upload a video and wanted to get a text transcript. Well, we will likely need to strip the audio track out of that video, then convert that audio into a format the transcription service will accept. This is what this transcode worker does, it takes the users uploaded files, and converts them into an acceptable WAV format.
Lets check our storage bucket too to make sure the files we uploaded actually made it here. Great, so you can see the job unique identifier here, then we have our three audio tasks sitting in the bucket. These match up to the messages we have sitting in RabbitMQ over here waiting to be transcoded.
Alright, so hopefully this all makes sense so far. Lets jump back to the diagrams and move on to the next stage in the process. So, we have that transcode worker that fetches the audio files from storage bucket, converts them into acceptable formats for us, then saves them back to cloud storage using a new name. Then, we submit a task back into the queue for this audio file to be transcribed.
So, lets jump back to the Cloud Console and turn on our transcode worker and see what happens. I’m just going to click into the transcode worker here. Then, click edit to modify the deployments yaml config file. I’m going to update this replicas value from 0 to 1. This is going to start 1 instance of our transcode worker.
Lets quickly jump over to the Rabbit interface and see what happens. So, you can see we have three messages sitting in the queue waiting to be processed. Then, just like that, they are moved over to the transcribe queue. So, what happened here is that transcode worker, downloaded each audio file, converted it, uploaded a new version, and then added new tasks into the transcribe queue. It happens so quickly too since these are smaller files. Lets check the storage bucket, and refresh the view, to verify this is actually true. Great, so you can see we now have our raw files here, in addition to these newly transcoded WAV files. Then, tasks for these new WAV files, were added into the Rabbit queue for the transcribe worker.
What’s cool about all this, is that we can have lots of workers in each queue processing jobs, and this will allow us to really scale things up. Say, for example that this application totally takes off and we’re processing thousands of jobs. We can easily handle that workload with this type of architecture. Well, we need to add redundancy, database caching, and things like that, but this is a good start.
Okay, lets flip back to the diagrams and check out how the transcription worker functions. The transcription service, grabs the task out of the queue, and submits a jobs into the cloud providers transcription API, along with a config and link to where our newly transcoded audio file is sitting in our cloud storage bucket. Then, the worker waits for this transcription job to complete, it might take seconds or many minutes. Finally, it completes and we save the raw JSON results back to cloud storage, and update the database with the final status and transcript data. Finally, we submit another task into our task worker queue for the notify worker service, to let the customer know their job is finally complete.
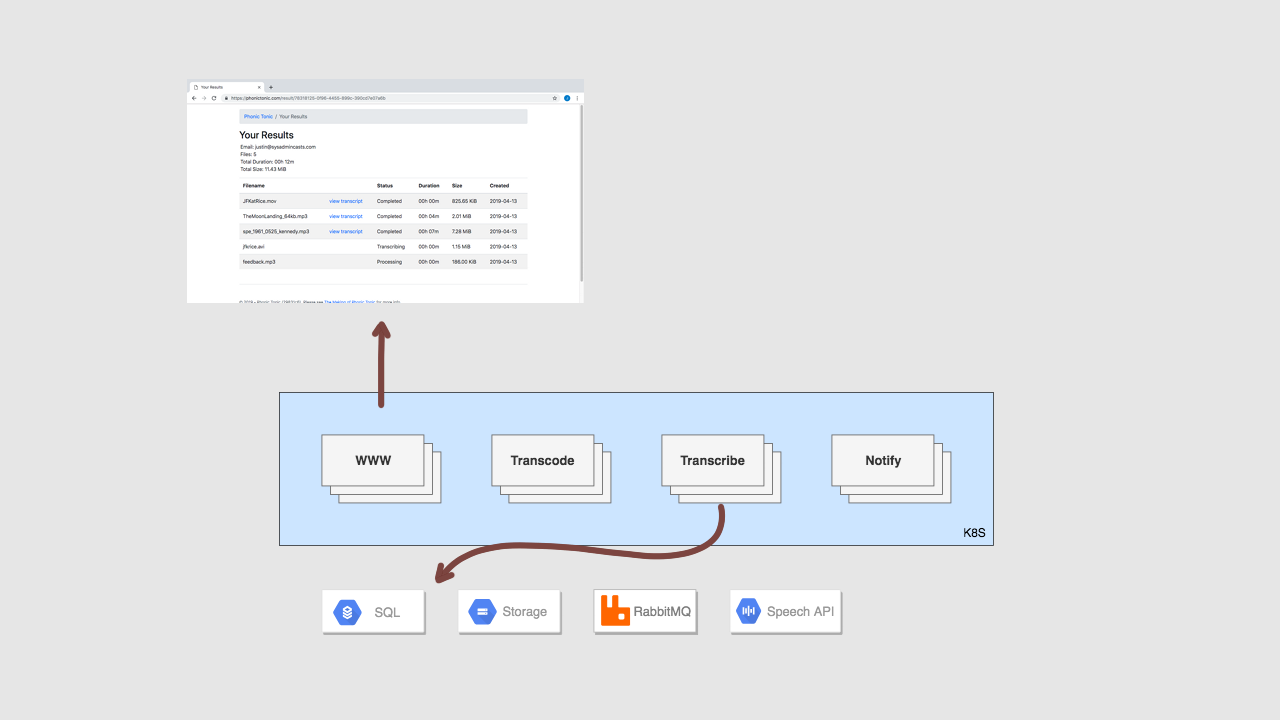
Lets head back to the Cloud Console and turn on the transcribe worker service. I’m just going to do the same thing here, edit the deployment, and change the replicas from 0 to 1, then save it. Now, lets go check the queues in Rabbit. You can see we have our three tasks in there. Cool, it looks like a task was just picked up and is being processed. Lets head over to the storage bucket, and refresh this a few times and see if we can catch the JSON file being uploaded here. Cool, so you can see a new file uploaded here and this is the raw JSON dump from the transcription API. I’m just going to open that in a new tab and we’ll check it out in a minute. I just want to head over to the Phonic Tonic website, for a minute, where we should see the status being updated to, transcribing. Great, looks like its working. Lets also check out that raw JSON dump that was uploaded to the storage bucket. So, this has all the raw data, for things like the words spoken, lots of timing information, etc. Then, if we head back to the website, we should see the transcript links starting to appear now. Cool, looks like its working. Lets check one of these out. Great, so you can see the human readable version of that JSON object that was uploaded to cloud storage. Basically, what I’m doing, is parsing through the JSON objects and grabbing all the text. What I’d like to do down the road, is to add some way to listen to uploaded audio here as well, then you can sort of edit it right here. Maybe, add some word highlighting as the audio plays, so you can follow along, since we have all that word timing information too.
So, lets jump back to kubernets for a minute. These workers and the queues are pretty much what makes this thing possible. Especially, once we have lots of jobs flowing through here, this would be pretty hard to do without this type of architecture. But, we’re not done yet. We still have these notify events to process.
Lets jump back to the diagrams for a minute. I never specifically called this out, but our transcription results page is continually checking the SQL database to see if things are finished. This allows the user to watch things in pretty much real time. This would be a great place for something like Redis results caching as we scale. Since, you could easily overload the database, if you have lots of folks checking this non-stop.
Alright, so lets walk through the final step here. How notifications are sent. So, once we start that notify worker, it will start grabbing tasks out of that Rabbit notify queue, and hypothetically sending emails. Right now, I have this disabled, and all the worker does it grab the jobs and sleep for a few seconds, before moving to the next job. Since this website is wide open right now, I didn’t want to allow the option of spamming people.
So, lets jump back to kubernets again. I’m just going to go into this notify worker deployment and edit that yaml file again, and change the replicas from 0 to 1, then save it. Then, lets flip over and watch what happens in the queue. Our, notify worker should be grabbing messages from the queue, and hypothetically sending them out. Perfect, all the messages are gone.

So, that is the end to end process of how this system actually works. This goes from uploaded audio files to human readable text. Although, audio is limited to the first 30 seconds for now. This typically happens really quickly, but we were able to slow things down by turning things on and off. This type of system also gives you lots of operational flexibility too. Say, for example that you needed to do maintenance on a backend system. Hopefully, you could just let jobs accumulate in a queue for a while, then just turn it back on, and watch the workers chew through the backlog.
So, that’s pretty much it for this episode. I didn’t want to get too heavily into the code, as typically we are most interested in the operational side of things. Basically, wanting to burn down this list of issues here, like hardcoded secrets, adding metrics collection, etc. Lets jump over to an editor for a minute. So, there are things in here we care about, things like the dockerfiles, the automated deployment scripts, and the kubernetes service bootstrap yaml files. In a upcoming episode, we’ll chat about secrets and environment variable in an attempt to remove the hard coded stuff here. You can see I added a few here already. Stuff like this, where you have database usernames, password, and all types of connection strings in here. I guarantee you will run into this on your own too.
So, as I mentioned before. In the next few episode we’ll really focus on logging, monitoring, alerting, and fixing the hardcoded stuff here. For example, on the monitoring front. I really have no idea if the services are working right now. There is no alerting. The queues could totally be filling up right now and the app broken. This is pretty common out in the real world too. I’m sure there are things at your work, for things you look after, that are not monitored too. This seems to be a continual battle. I struggle with it too. So, we’ll look at some tools that can help.
Alright, that’s it for this episode. If you have any episode ideas, or ways that you think I could improve the site, please let me know. Thanks for watching. I’ll cya next week. Bye.