- Docker - Build, Ship, and Run Any App, Anywhere
- dotCloud - One home for all your apps
- Episode #24 - Introduction to Containers on Linux using LXC
- Episode #14 - Introduction to Linux Control Groups (Cgroups)
- Episode #4 - Vagrant
- Github: phusion/open-vagrant-boxes
- An update on container support on Google Cloud Platform
- Docker Documentation
- Docker Hub Registry - Repositories of Docker Images
- Dockercon keynote: Eric Brewer (Google)
In this episode, we are going to be looking at Docker. I have broken this episode into two sections. First, we will cover what Docker is at a high level and touch on the container workflow. Second, we will look at a live demo of Docker in action.
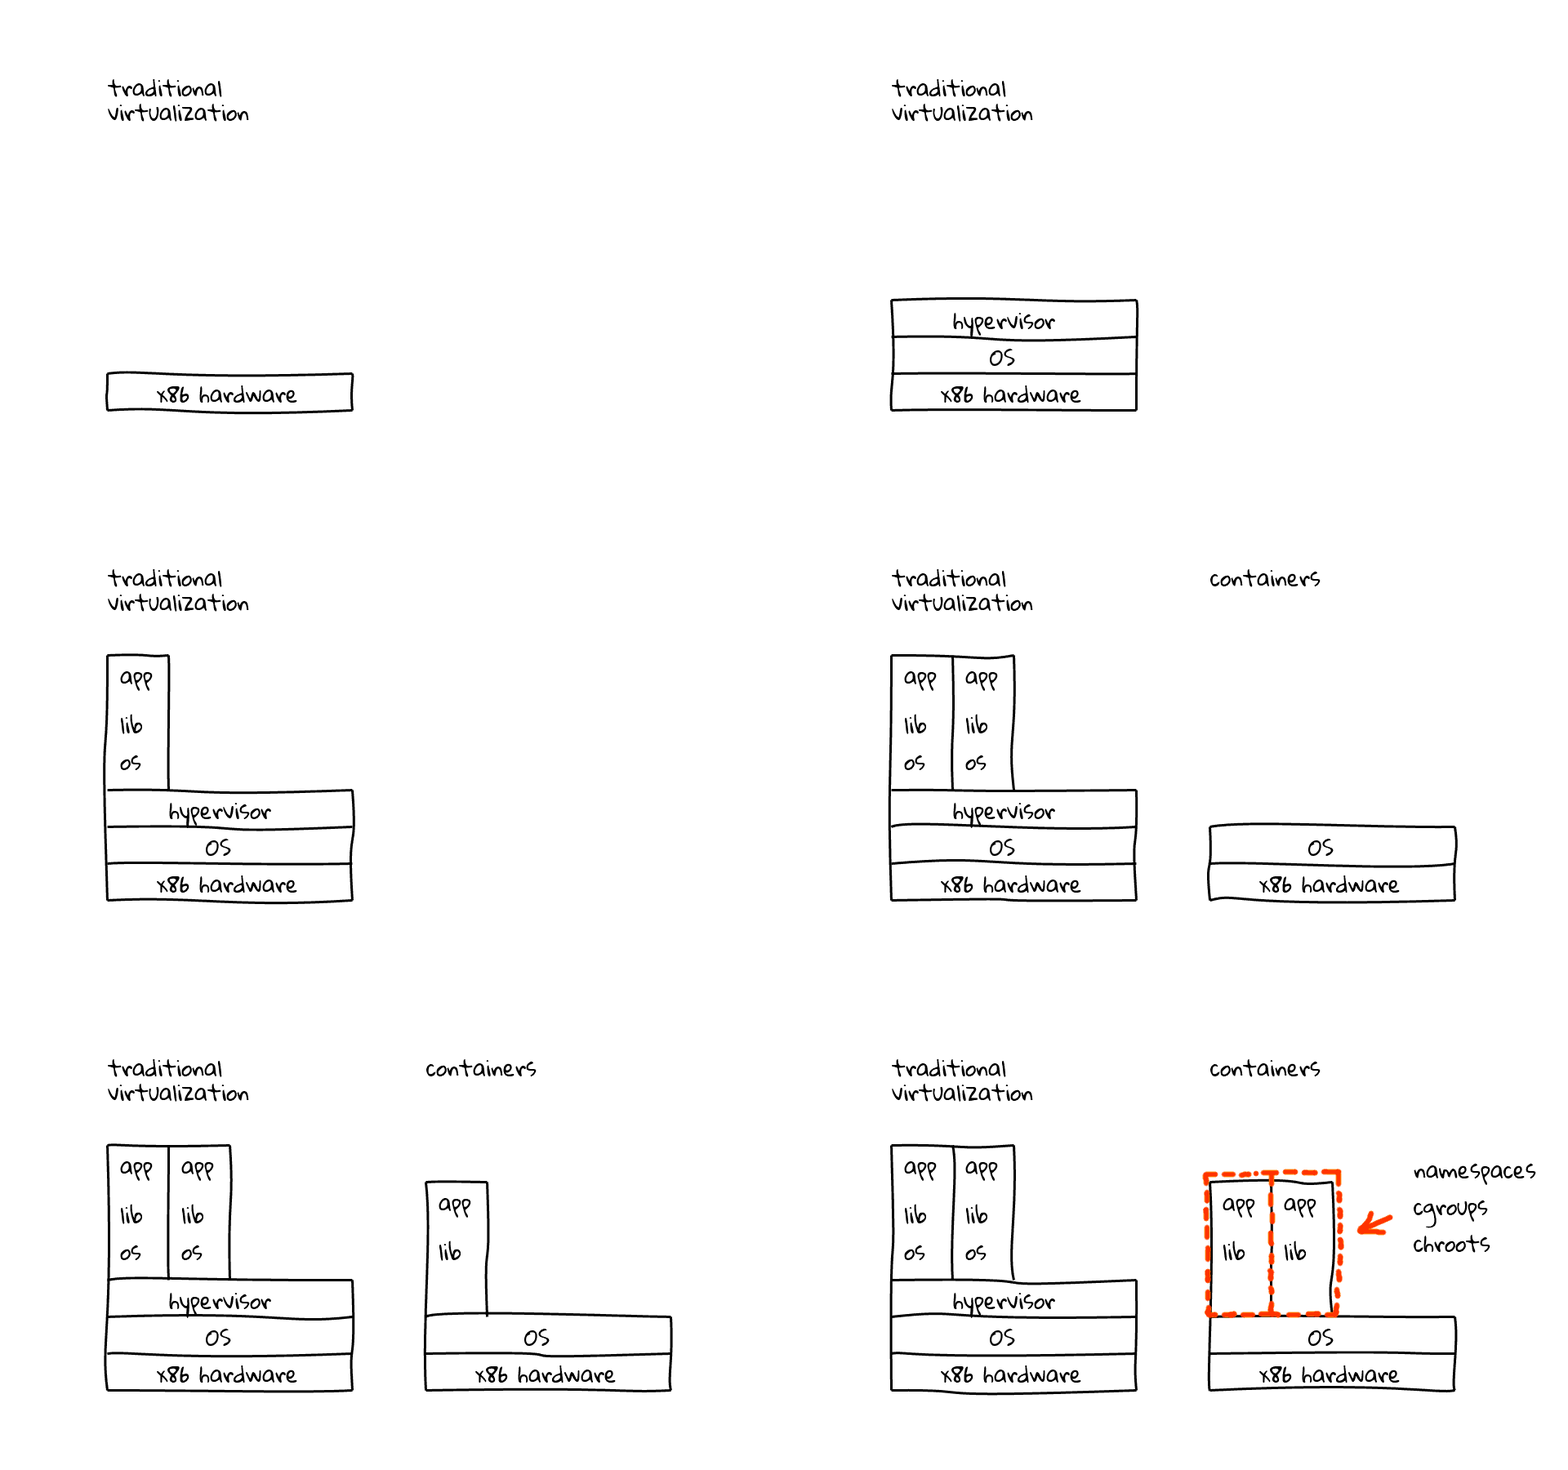
For you to really understand what Docker is, and why it is useful, you first need to know what containers are. I discussed containers the concept at length in episode #24, but lets recap for a minute, with a focus on Docker. Personally, I think containers are best described when compared to traditional virtualization. With traditional virtualization, you start out with the physical hardware, next you have the operating system, then the hypervisor. Finally you have virtual machine images which interface with the emulated hardware provided by the hypervisor, thus allowing you to create many self contained systems. This is well documented and understood, so lets move on to how this compares to containers.

Containers have a similar foundation, starting with the hardware and operating system, but this is where things take a turn. Containers actually make use of Linux kernel features called namespaces, cgroups, and chroots, amongst other things, to carve off their own little contained operating areas, and the end result looks much like a virtual machine, just without the hypervisor. One really cool thing about containers is they they do not require a full operating system, just your application and all required dependencies, if you happen to statically link your app, then this container could be extremely small, the result is lightweight container images. In a nutshell, containers are a method for isolation via namespaces, and resource control via cgroups, much like traditional virtualization, just without the hypervisor and operating system overhead. I think it is a fitting analogy to compare containers to traditional virtualization, because even though the technologies are different, the end result looks vary similar from an applications perspective.
So, now that you know containers provide isolation and resource control via kernel features, where does Docker fit in? Well, containers are really cool, but one of the major pain points in using them, was the absence of a container standard and tools for easily managing the container workflow. This is where Docker steps in. By the way, I should mention that Docker did not invent containers, and the concept along with various implementations have been around for 30 years.
There seems to be lots of misunderstandings about what containers are, how they work, and where Docker fits in. So, I just want to break the various pieces apart and show you where they fit. I should mention that Docker only works on Linux right now because it uses Linux kernel features, however, you can run Docker on all the major operating systems via a Linux virtual machine like we will be doing in the demo later. However, Docker is allowing people to standardize on a container format and getting the tool chain sorted out. This opens a world of possibilities if other operating systems want to adopt a similar model.
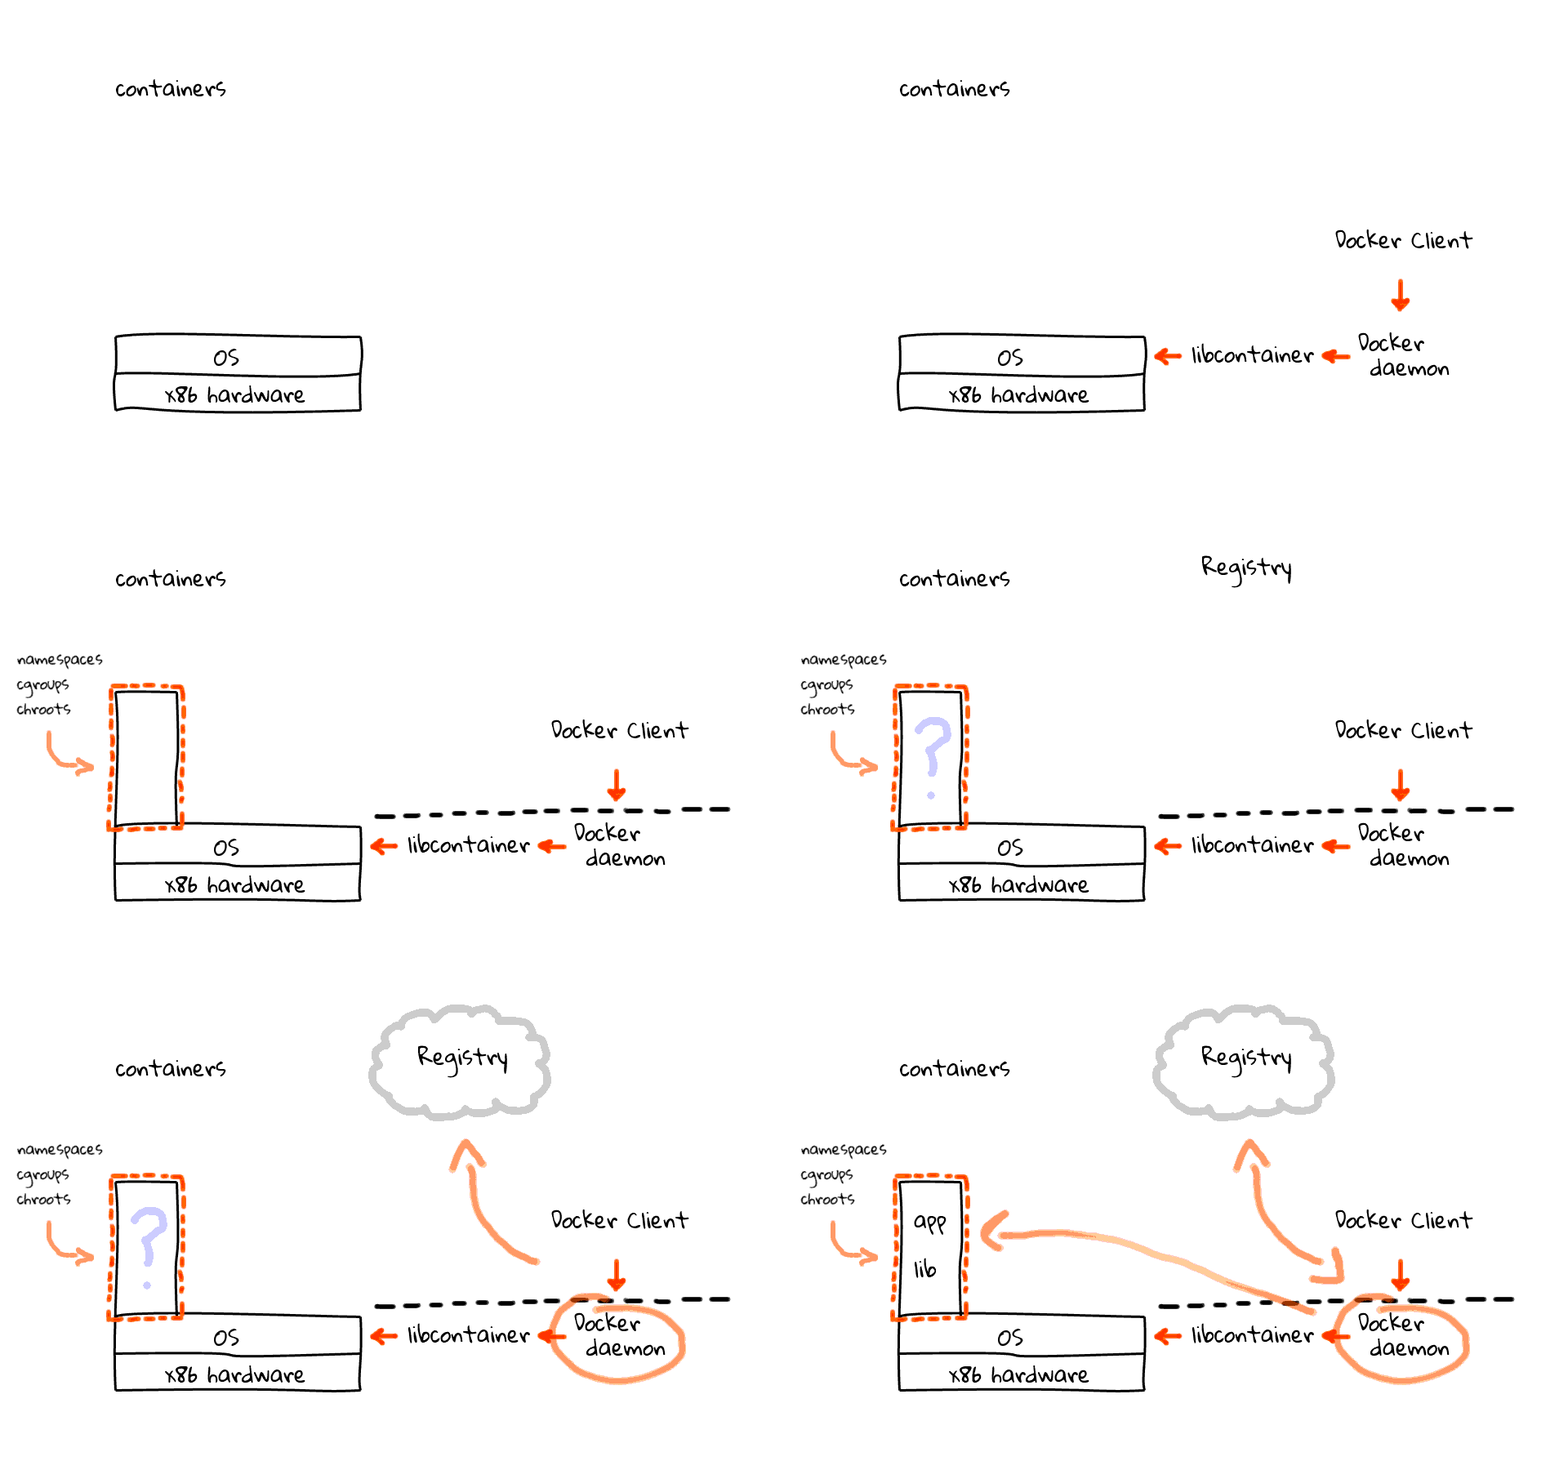
To really understand containers and Docker, lets just jump back and focus on containers for a second, because I want to make sure this is clear. So we have our hardware and Linux OS over here. Then lets walk through the four main pieces that make up Docker, along with what the workflow looks like.
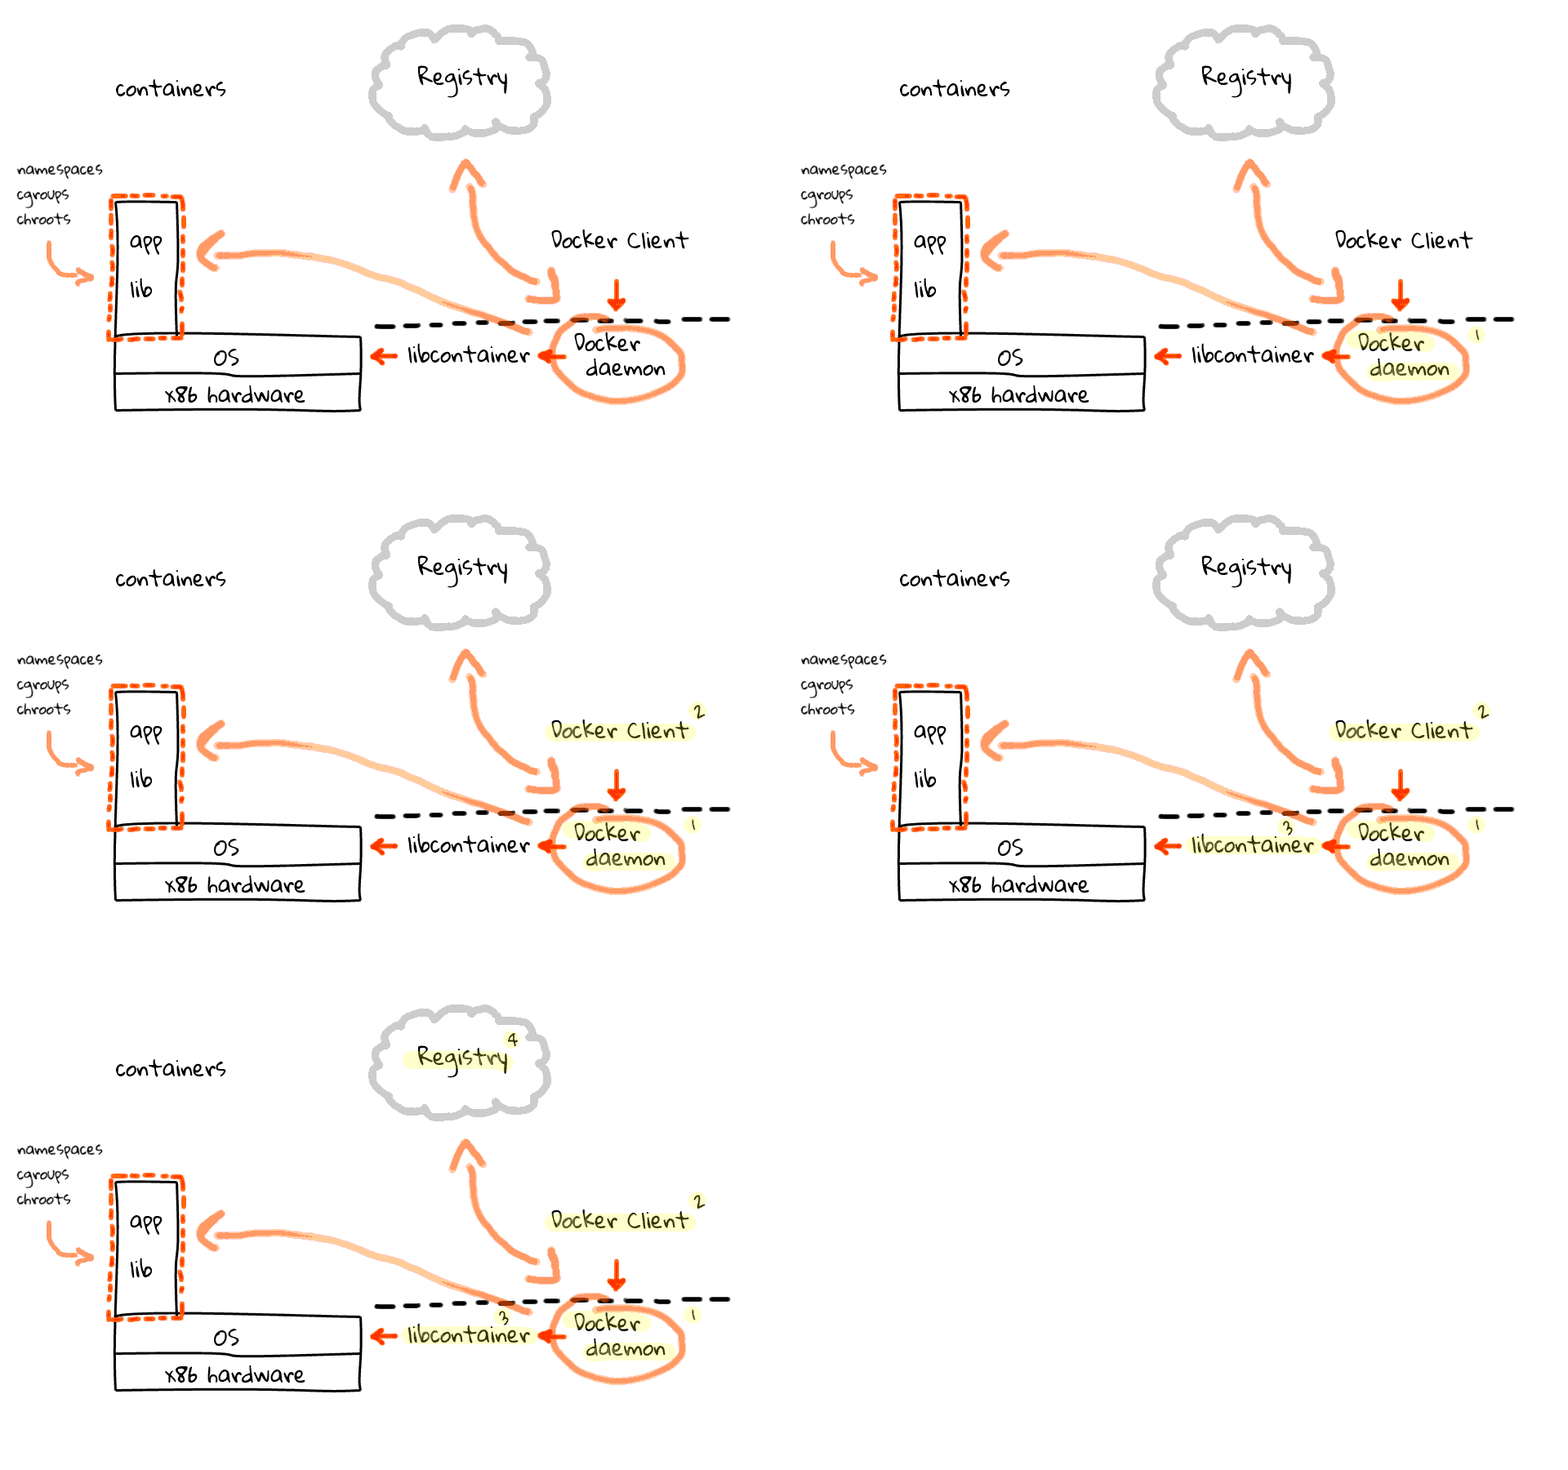
First off, you have the Docker daemon, this sits on your server machines and accepts commands from a Docker client, this can be either a command line utility or an API call. Next, the Docker daemon talks to the Linux kernel via a library called libcontainer, also part of the Docker project. In the past, Docker was simply a wrapper around LXC, but since then they have migrated to libcontainer.
I should mention that the Docker daemon and libcontainer sit on the server, where the client does not have to. I will just add this line to indicate the separation of the client and server. So, what does the workflow look like? Well, the Docker client tells the Docker server, to create a container, using a specific image. The Docker server, by proxy of libcontainer, works with the Linux kernel to create a container, using that image. The container is constructed using namespaces, cgroups, chroot, amongst other kernel features to construct an isolated area for your app, in here. But where does your app and libraries come from? Well, this brings us to the four piece of the Docker puzzle. Something called the Registry. The Registry is something provided by Docker, sits in the cloud, and provides an area to upload, download, and share you container images. The registry is open-source too, so you can download it and host a local version for private container images.
Okay, so lets say we wanted to push an image into a container? The client tells the server, use this image, and pop it into a container. The server then head out to the registry and downloads the container image, if it is not already cached locally, then takes that image and pushes it into a container. This is a pretty high level overview of how things work. There are all types of exceptions that could happen along the way, but generally, this is how it works.

Lets just quickly recap the four major pieces that make up Docker. Docker is a server sitting on your operating system, a client application, either a command line tool or an API call, next there is libcontainer which is used to talk to the kernel, finally we have the registry, which acts as a repository for all images, and it can either be the one provided by Docker or a local version. Okay, so hopefully this jumble of lines make sense.

I just wanted to chat about the hype of a minute. There have been countless news stories about Docker over the past 16 months. Personally, I think we are about to see a massive change in the way we think about virtualization. Lets just focus on this slide for a second. What happens when you are not required to use traditional virtualization software to get isolation and resource control? I imagine a state where we will have both systems running, but what happens if there is a migration to containers? Personally, I see Docker as a disruptive technology. It has the potential to turn the virtualization industry upside down. All the sudden cloud providers can see better utilization and performance because the hypervisor is gone. Private companies do not have to pay for expensive hypervisor software. Docker is more than just software, it is a container standard, which might be used across operating systems. It is interesting to take this idea and think about where the industry will be in three to five years from now. Anyways, this is why I think keeping an eye on Docker would be a good idea.
Docker actually has its roots in a hosting company called dotCloud. Basically, from what I have read while doing research for this episode, dotCloud uses containers internally to run customer code, and over time they built up an arsenal of useful tools and know how for working with, and managing many containers. In 2013, dotCloud thought their internal tools for managing containers would be useful to others, so they released them as open-source project called Docker. From there, Docker very much took on a life of its own, and if you fast forward 16 months till today, there have been lots of interesting developments in the container space. There is also an extremely fast growing ecosystem around Docker, along with gaining major industry partners, the likes of Google, Redhat, Openstack, Rackspace, and Canonical.
Google recently came out and said they are running everything from Search, Docs, to Gmail run inside containers. They are not using Docker, but are starting to feed their lessons learned while running 2 billion containers per week, into the Docker project. Exciting times, sorry I am feeding the hype machine, but it is hard not to get excited about the next couple years and what containers will mean.
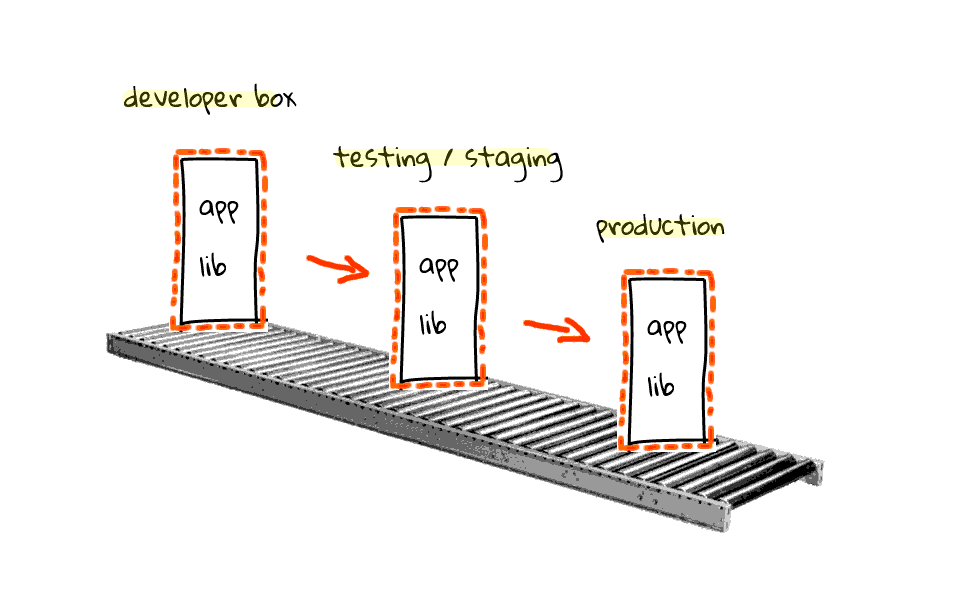
Just one more example about the deployment workflow. Think of a conveyor belt for a minute. At one end you have your developer boxes, qa/testing/staging boxes in the middle, and then production as the destination. Containers are so easy to use and package with Docker, they allow you to use the same images all along the way. There is no more, it works on my machine, type problems. This has the developer community abuzz too. Anyways, the Docker journey is just getting started, it will likely morph and continue evolving, so something I said today will likely change tomorrow. Okay, enough diagrams and chit chat, lets jump into the demo.

My hope is that you can follow along with the demo today. Back in episode #4 we looked at using Virtualbox and Vagrant to quickly create virtual machines for testing. Well, it just so happens that there are Vagrant boxes which can be used for playing around with Docker. I highly suggest watching episode #4 so that you can get this setup on your system. All major operating systems are support by Virtualbox and Vagrant too.
Lets get started by heading over to the Phusion Github repo where you can use Vagrant to download these Docker friendly Vagrant virtual machines. I am just going to scroll down here and copy this Vagrantfile into a file on my system where we can then run Vagrant to download this virtual machine. Just watch episode #4 if you are interested in getting this going for yourself.
mkdir e31
cd e31
cat >Vagrantfile
# Vagrantfile API/syntax version. Don't touch unless you know what you're doing!

VAGRANTFILE_API_VERSION = "2"

Vagrant.configure(VAGRANTFILE_API_VERSION) do |config|
  config.vm.box = "phusion-open-ubuntu-14.04-amd64"
  config.vm.box_url = "https://oss-binaries.phusionpassenger.com/vagrant/boxes/latest/ubuntu-14.04-amd64-vbox.box"

  if Dir.glob("#{File.dirname(__FILE__)}/.vagrant/machines/default/*/id").empty?
    # Install Docker

    pkg_cmd = "wget -q -O - https://get.docker.io/gpg | apt-key add -;" \
      "echo deb http://get.docker.io/ubuntu docker main > /etc/apt/sources.list.d/docker.list;" \
      "apt-get update -qq; apt-get install -q -y --force-yes lxc-docker; "
    # Add vagrant user to the docker group

    pkg_cmd << "usermod -a -G docker vagrant; "
    config.vm.provision :shell, :inline => pkg_cmd
  end
end
Okay, now that we have the Vagrantfile on our system. Lets run vagrant up to download the Docker friendly Vagrant virtual machine and start it on our system. What is so great about Vagrant, is that no matter your operating system, we can all use the same virtual machine for playing around with Docker.
vagrant up
So, as you can see Vagrant used the Vagrantfile to download our image and install Docker. Next lets run vagrant status to verify things are good. Looks good, so lets login with vagrant ssh. We are now inside our Ubuntu 14.04 virtual machine that has Docker installed on it. Lets just su to root so we can play around. Just going to show you the Ubuntu and Linux kernel releases so that you can verify your setup if needed.
vagrant ssh
Now we are ready to start playing around with Docker. The first think you probably want to do is run the docker command without any arguments. This shows the docker clients help message and command options. There is actually so many options that it scrolls off my screen, let me just jump up to the top here for a minute.
docker
Usage: docker [OPTIONS] COMMAND [arg...]
 -H=[unix:///var/run/docker.sock]: tcp://host:port to bind/connect to or unix://path/to/socket to use

A self-sufficient runtime for linux containers.

Commands:
    attach    Attach to a running container
    build     Build an image from a Dockerfile
    commit    Create a new image from a containers changes
    cp        Copy files/folders from a containers filesystem to the host path
    diff      Inspect changes on a containers filesystem
    events    Get real time events from the server
    export    Stream the contents of a container as a tar archive
    history   Show the history of an image
    images    List images
    import    Create a new filesystem image from the contents of a tarball
    info      Display system-wide information
    inspect   Return low-level information on a container
    kill      Kill a running container
    load      Load an image from a tar archive
    login     Register or log in to the Docker registry server
    logs      Fetch the logs of a container
    port      Lookup the public-facing port that is NAT-ed to PRIVATE_PORT
    pause     Pause all processes within a container
    ps        List containers
    pull      Pull an image or a repository from a Docker registry server
    push      Push an image or a repository to a Docker registry server
    restart   Restart a running container
    rm        Remove one or more containers
    rmi       Remove one or more images
    run       Run a command in a new container
    save      Save an image to a tar archive
    search    Search for an image on the Docker Hub
    start     Start a stopped container
    stop      Stop a running container
    tag       Tag an image into a repository
    top       Lookup the running processes of a container
    unpause   Unpause a paused container
    version   Show the Docker version information
    wait      Block until a container stops, then print its exit code
These commands essentially allow you to manage the lifecycle of a container, things like building, sharing, starting, inspecting, stopping, killing, and removing containers. Lets just run docker version, so that if you happen to come along and try this for yourself, you what what version I was using. Looks like we are using client and server revs 1.1.2.
# docker version
Client version: 1.1.2
Client API version: 1.13
Go version (client): go1.2.1
Git commit (client): d84a070
Server version: 1.1.2
Server API version: 1.13
Go version (server): go1.2.1
Git commit (server): d84a070
Lets jump back to the diagrams for a second, at this point we have the operating system up, and Docker is installed. Lets work through the example of telling Docker that we want to contact the Registry, download an ubuntu container, and run a shell inside that container.
Lets run docker run, dash t, tells docker to allocate a tty, dash i, this allows us to interact with the container, by default it will go into the background, next we need to type the container image name we can to run, lets type ubuntu, and finally, lets provide the command we want to execute inside that container, in this case /bin/bash. I should mention that by default Docker hits the public image Registry, you can go and search for any pre built images, there is actually some interesting ones to play around with up there. Anyways, lets just tell Docker that you want to run a specific version of ubuntu, how about 12.04 for example.
docker run -t -i ubuntu:12.04 /bin/bash
After I hit enter, Docker looks locally to see if it already has the ubuntu:12.04 image in its cache, it does not, so it head off to the Registry and downloads it. Docker uses some really cool filesystems tricks which allow you to chained or stack filesystems together. This is useful for building a base image and then tacking your apps on. I plan to cover this in detail in a future episode.
Finally, you will notice that the prompt changed. We are now sitting on a shell in our ubuntu 12.04 container. Lets run the ps command to verify there is no traditional operating system running here. As you can see we only have two processes, the shell, and our ps command. You will also notice that the process number are really low. This is because we are using a namespace for this container which carves off our own little process area.
Let me just go split screen here for a minute. In the top terminal window we are running our Docker ubuntu 12.04 container image. Down in the bottom terminal window we are sitting on the Vagrant virtual machine where Docker is running. Inside the container lets list the processes again, then do the same outside the container, notice how we have out shell as a child hanging off the Docker daemon? Lets run an active process in the top window and rerun our process list down here. As you can see, the container thinks it has its own process list, and this is because of our container process namespace. Lets exit these and clear things up. I am just going to run ip a, so that I can show you that the container also has its own IP address, which is different than the Docker server. The reason for this is that the container is also using a namespace for networking.
Finally, lets go back to full screen and exit the container. I should mention that Docker has its own method for displaying containerized processes. I just wanted to illustrate that when you are inside a container, your view of the world in terms of networking, mounts, process, users, etc is much different, than if you are on the host.
Lets just rerun the docker command. You will notice here, that Docker provides the ps command. Lets try and run that. There is nothing listed here, because we are not running any active containers, however, if we were they would be listed. You can also use the dash a option to show you all containers including ones run in the past. Here you can see the ubuntu 12.04 container we ran, along with the process which was executed, and some timing information.
docker run -t -i ubuntu:12.04 /bin/bash
docker ps
CONTAINER ID        IMAGE               COMMAND             CREATED             STATUS
docker ps -a
CONTAINER ID        IMAGE                       COMMAND             CREATED             STATUS
3410570f6714        ubuntu:12.04                /bin/bash           7 hours ago         Exited (0) 5 hours ago
Docker actually has so many commands that you could play around with them for hours. Just wanted to show you a couple things before we conclude the episode. The first one is the docker images command. This outputs a listing of all the images cached on your machine. You can see we have our ubuntu 12.04 image here, and it was used to run our container a couple minutes ago. One really cool thing about Docker is the way it deals with filesystems, in that each container spawned, gets a new filesystem with only its changes. So you can do cool things, like diffing our containers filesystem to see what changed from the original.
docker diff 3410570f6714
A /.bash_history
Anyways, I have probably talked long enough. This episode likely leaves you wanting more, as I have had many emails suggesting Docker as an episode topic. Docker is a large topic to cover in a short screencast format, so going forward, I hope to create several more episodes around Docker as I explore the topic in detail. One reader sent me a note suggesting that I create an episodes series, so that we can explore one topic in great detail. Personally, I think this is an amazing idea, and what better technology to start with. So, over the coming months, I plan on looking into Docker networking, orchestration, namespaces, cgroups, filesystems, and how to create images from scratch. Should be an interesting episode series, so stay tuned. Also, if you have suggestions, please shoot me a note.
Hopefully this episode give you an idea of what the Docker project is about along with a starting point so that you can play around with it for yourself.