- Demo Page - Kubernetes Pod Load Balancer
- Kubernetes - Production-Grade Container Orchestration
- Kubernetes - Picking the Right Solution
- Kubernetes - Learn Kubernetes Basics
- Github - Kubernetes Pod Load Balancer Demo
- Docker Hub - jweissig/alpine-k8s-pod-lb-demo
- Github - Kubernetes The Hard Way
- Amazon - Kubernetes: Up and Running: Dive into the Future of Infrastructure
Kubernetes General Explanation
In this episode, we are going to check out Kubernetes, which is very popular for Container Orchestration. We will chat what Kubernetes is, why people are using it, and then look at how it works by deploying an example application to a test cluster.
Introduction
The Kubernetes site has a pretty good summary of what Kubernetes is. It says, “Kubernetes (k8s) is an open-source system for automating deployment, scaling, and management of containerized applications.” But, what does that actually mean?
Well, lets jump over to our Containers In Production Map for a second and zoom into the Container Orchestration section. Container Orchestration is really the heart and sole of your production deployment, as it will automate much of the deployment and scaling bits needed for running containerized applications. You cannot get far without it.
For this episode, I wanted to take a step back for a few minutes and just chat generally about the concept of Container Orchestration, and what that means. As, most of these Orchestration tools, even outside of Kubernetes, have these types of features. So, it makes sense to chat about it in general and hopefully that will flush things out. I have created a few diagrams that will help explain what I am talking about.
What is Container Orchestration?
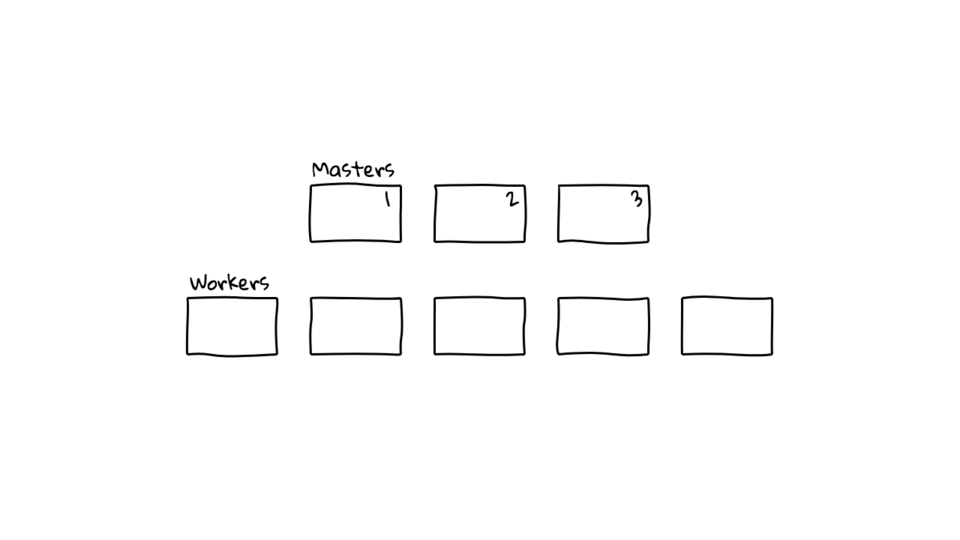
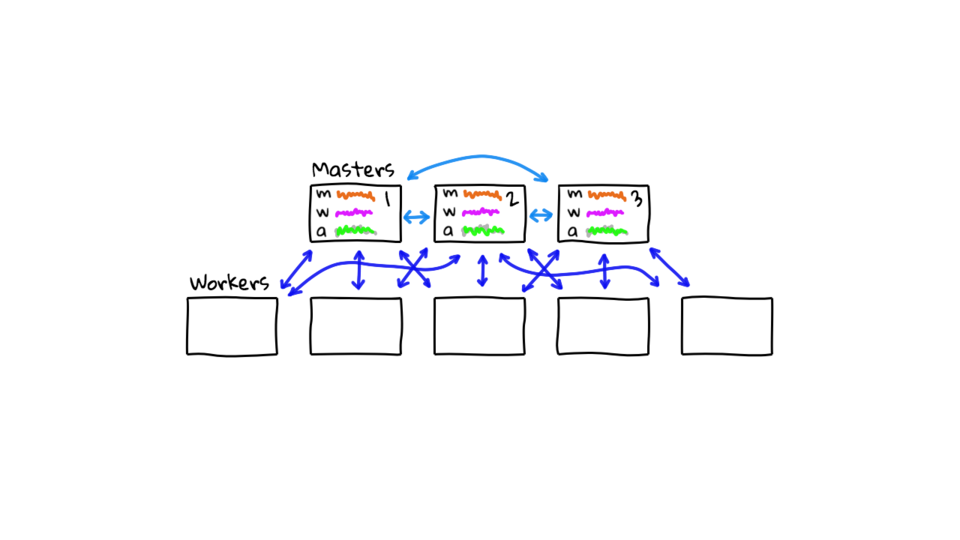
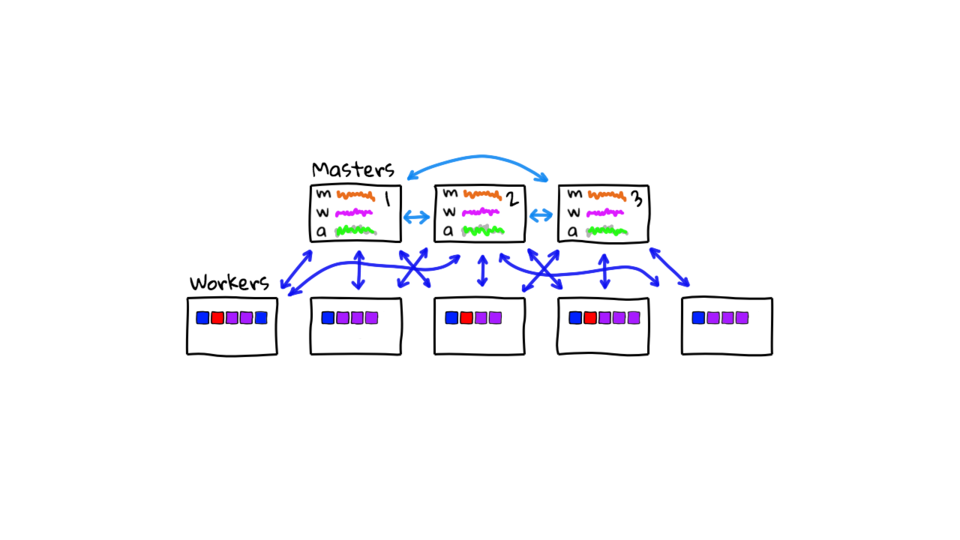
So, what is Container Orchestration? Well, lets mock up an example cluster here, then walk through a few scenarios. Imagine you have 3 servers, we will call these Master nodes, these are in charge of running your cluster. Next, you have a set of Worker nodes. All of these machines will typically be running a fairly minimalistic operating system with Docker installed. Once they are configured, you are typically not doing anything with them, except running containerized applications. I added the 3 Master nodes, and 5 Worker nodes, for High-Availability. The general concept, is that we can have a few of these nodes fail and things will still be okay, because we have built in redundancy.
Also note, these Master nodes are special, in that they will be coordinating what is happening on the cluster, along with scheduling and monitoring container deployments. These Master nodes are constantly chatting with each other too, they use tools like etcd (a distributed database), to share state and prevent any one Master Node failure, from taking down the cluster. You will typically not run anything on these Master nodes, except the software for managing the cluster. Basically, you are not running workloads there.
The Master Nodes, besides chatting amongst themselves, are also in constant communication with the Worker Nodes, to make sure things are healthy and running as expected. I think of it as these Master Nodes are constantly tracking things like: the status of all Master Nodes, the status of all Worker Nodes, and the status of all Containerized Applications deployed into the cluster. This state information is constantly replicated across all master nodes too.
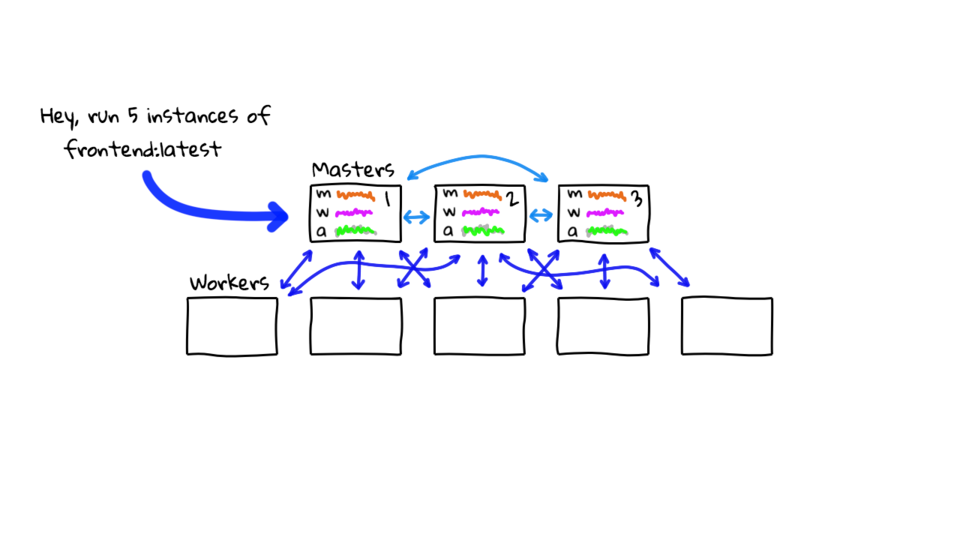
Now that we have our example cluster up and running with Master and Worker nodes. Lets deploy an application to it. You might say, “Hey cluster, run 5 instances of my frontend container”. To do this with Kubernetes, you will typically use the kubectl command to connected to a Master Node, and either pass in command-line arguments, or pass in a YAML file that describes your application, and what you want to happen. You can automate this down the road with a continuous integration pipeline too.
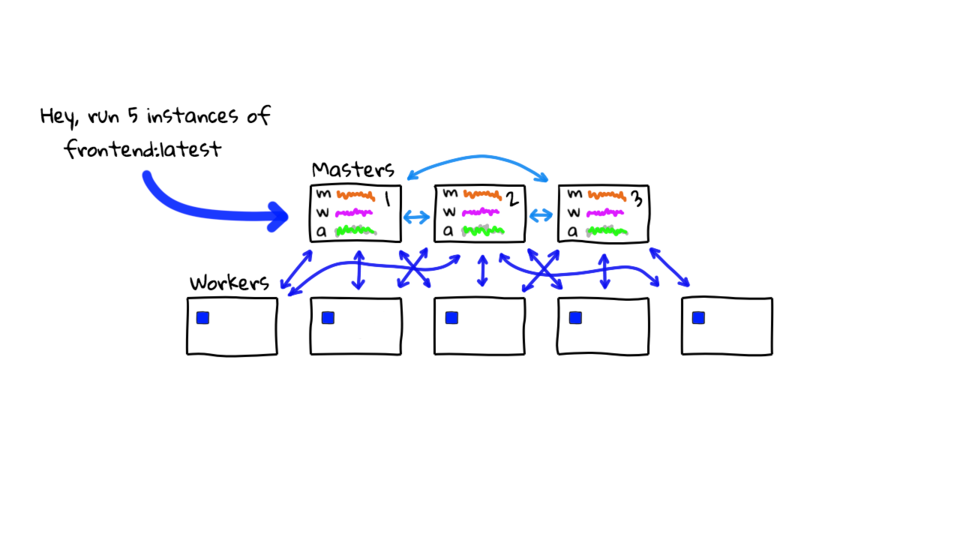
These Master Nodes will do a bunch of stuff based off your request (if you are authenticated of course). They will look at the available Worker Node resources and start to schedule the deployment of your dockerized application across the cluster. The Master nodes will instruct the Worker nodes to pull down the frontend containerized application and start it up. This is indicated by these blue boxes being pushed out here. You will notice that your application is automatically distributed across the Worker nodes in the cluster too. Since we asked for 5 instances of our app to be deployed.
But, say for example, that a few hours pass and one of these containers crashes on the center worker node here.
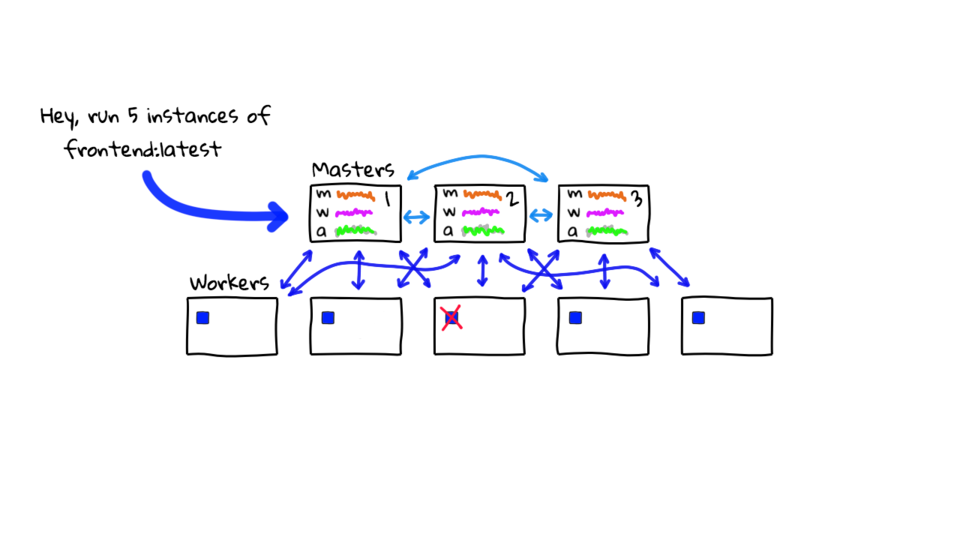
The cluster will all the sudden notice that it only has 4 instances running, but you asked for 5.
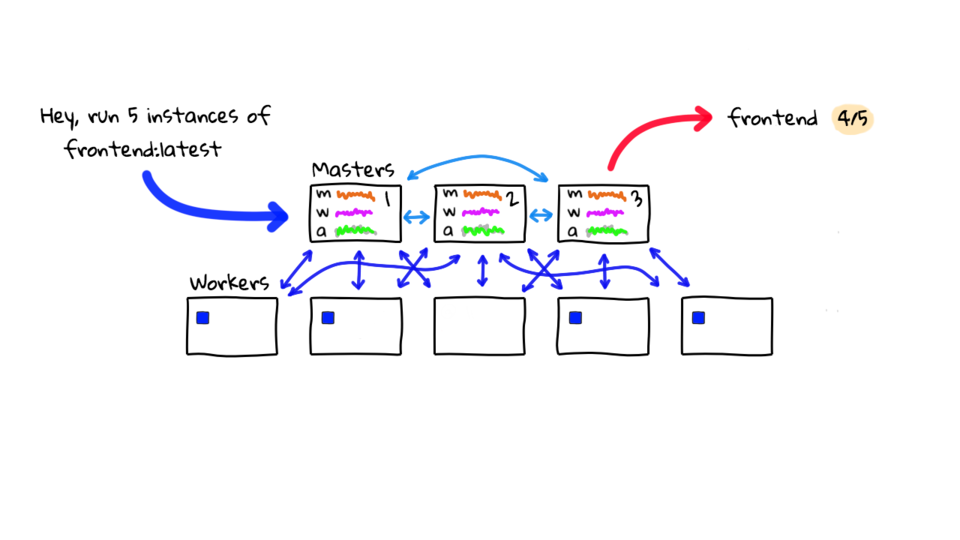
So, it will take action to self heal the application by starting another instance, so that it has the desired 5 instances. The cluster is constantly evaluating its current state against what is expected.
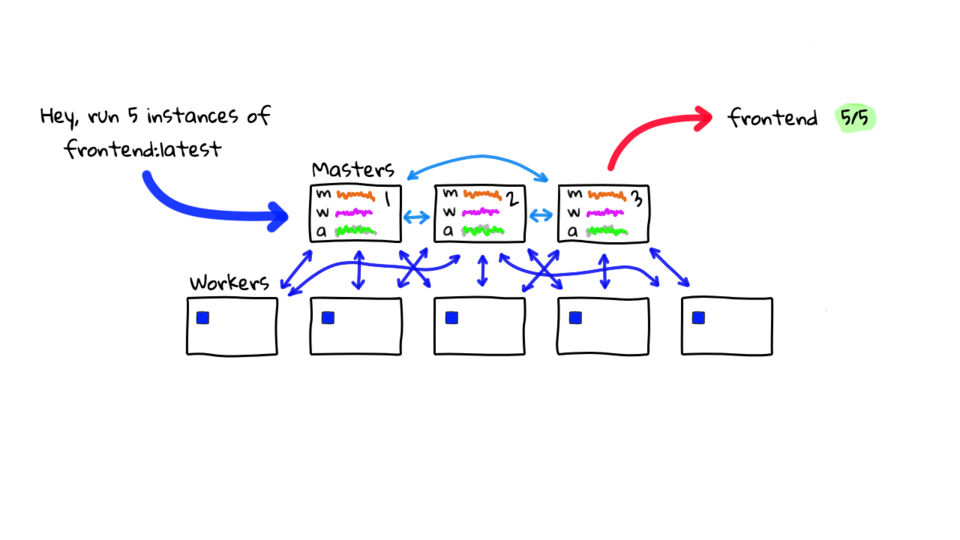
This right here, is what I think of as the the General Concept behind Container Orchestration. Basically, Orchestration allows you to make the jump from running Docker on a single machine, to running Docker on multiple machines without going crazy. Imagine trying to run 20 different application types, all with multiple instances, across a bunch of machines. It would be near impossible to do this manually. So, this is why Container Orchestration tools like Kubernetes exist.
Lets walk through deploying a few more applications and then chatting about the pros and cons. Maybe there is another group at your company and they want to deploy 3 instances of their backend application. Again, they pass this request in via the kubectl command with a YAML file that describes what they want, to the Master nodes.
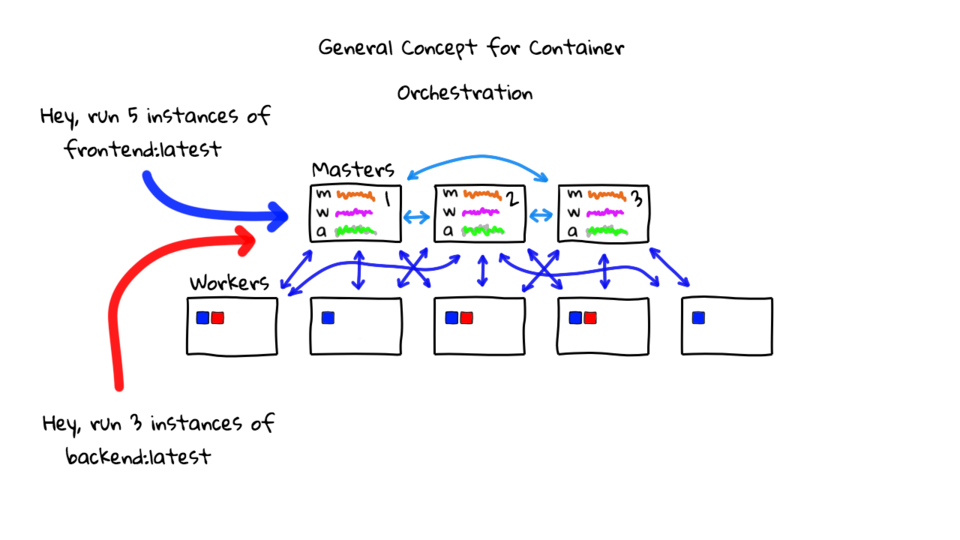
Kubernetes looks at the request and schedules the deployment across your Worker nodes. You will notice here, that the red dots skipped a Worker node. Kubernetes is constantly looking at Worker nodes, to see what their resources are like, and will try to pick what it thinks is the best Worker for that workload. Most orchestration tools allow you to configure how this works thought.
Lets deploy another application. Say you have an analytics group, who are tracking your application usage, and they collect tons of metrics. So, they want 10 instances of their analytics web app deployed. Again, Kubernetes will schedule and deploy their containers, just like before.
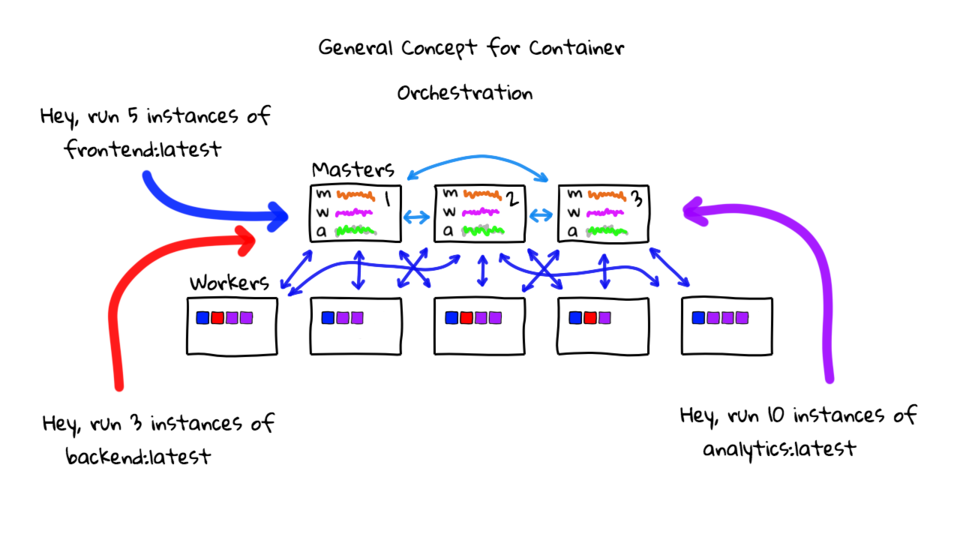
Lets stop here for a minute. One of the really cool things about Container Orchestration in general, is that you can take a group of machines, and use them to run all types of different containerized applications. Before containers came along, I used to have sets, or groups, of machines dedicated to each type of application I wanted to run. Things like processing node, web servers, log processing, etc. Here, we are taking a single group of machines, and easily deploying many different types of applications to them. With Docker with Orchestration software, you can greatly drive up hardware utilization. This often leads to you running less hardware and driving costs down!
Also, what is cool about Container Orchestration is you are basically handing the day-to-day operations of your running applications over to this Orchestration software. What does that mean? Well, before this type of software arrived, you would typically have a sysadmin, me, who took all types of requests and would manually install and look after things. Or, better yet, I would use configuration management software, but still have to keep any eye on things. When things failed, like an application died, or a machine failed, I would get paged and have to do something about it. With Docker, Orchestration software, and Cloud, almost all these types of problems go away. It is pretty amazing!
Lets explore what happens when a Worker node has a critical failure. For example, the last Worker here went down hard and stopped responding, but it was running some containers for our Analytics and Frontend applications.
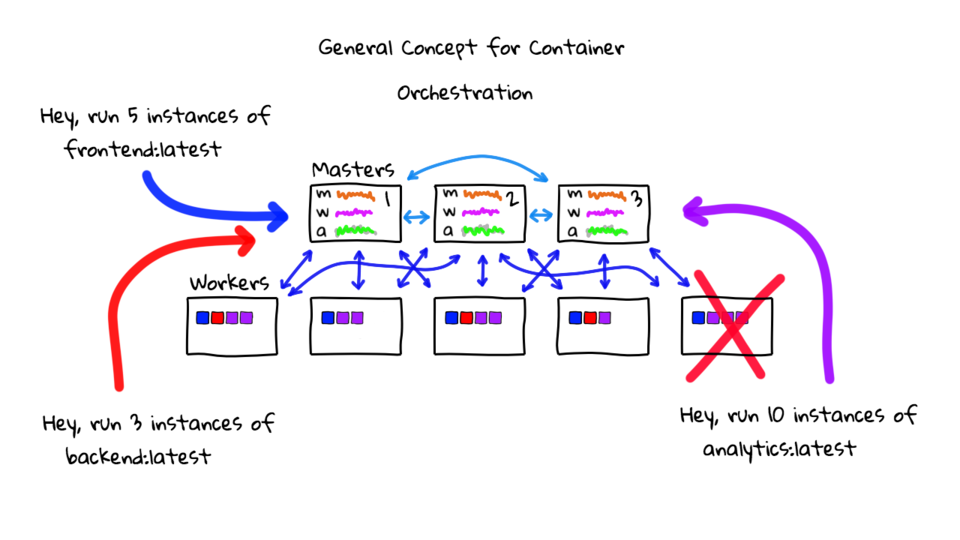
Well, again, the Master nodes are constantly checking the health of pretty much everything, and will quickly notice the containers have gone away, and that the Worker has stopped responding. The cluster will attempt to self heal, and it will look something like this, Analytics and Frontend are both having issues, Analytics should have 10 instances running, but I only see 7. Frontend should have 5 instances running but I only see 4.
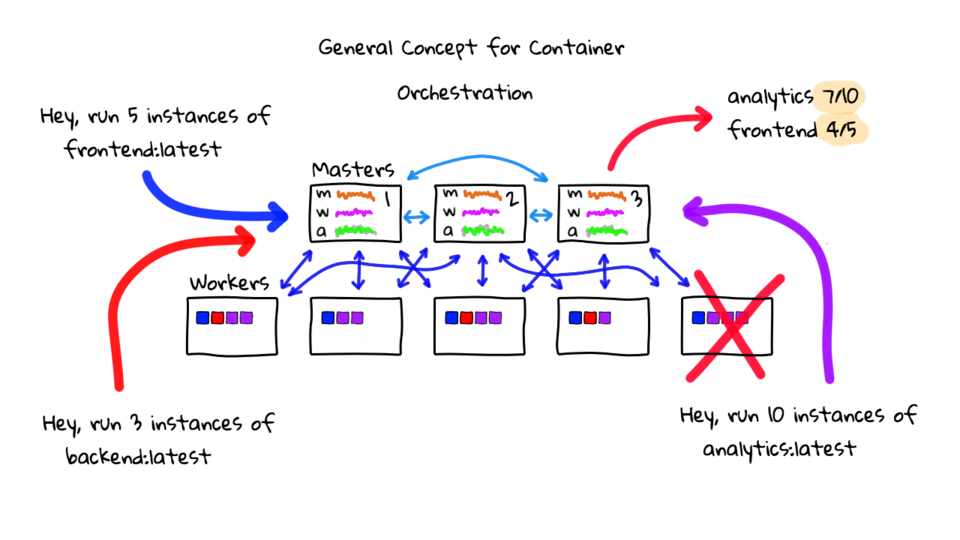
Lets, redeploy these failed instances to healthy Worker nodes, so we get those instance counts back up to where they should be.
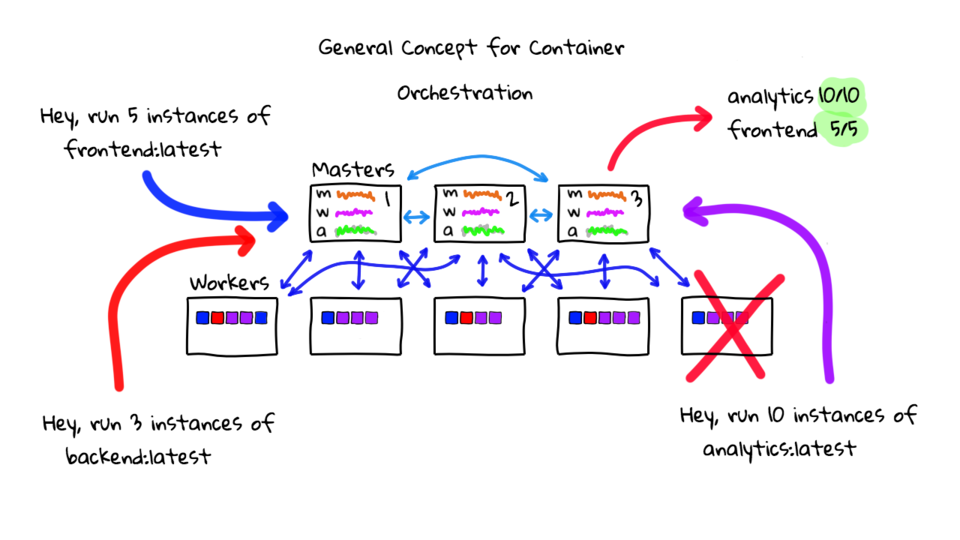
You will notice this is pretty much like the logic that would happen if you go paged at 2am. Which is pretty awesome that it just happens on its own.
So, what are some of the pros to using Container Orchestration? One really big one is that it frees you up from the day-to-day manual work of doing this type of stuff. I honestly do not know if you could even manage all the complexity without Orchestration. We are not talking about small apps here, typically we are talking about startups or enterprises that are using this type of thing. They have tons of applications and a need to run this across lots of machines. They can really drive utilization up from where it is today. The self healing part is really awesome too. If you are using a Cloud provider, the backend infrastructure can likely replace these failed Worker nodes automatically too, to replace that missing capacity.
Well, hopefully you found that useful. Most Orchestration tools have these base features but many go well beyond this too. Personally, I think Containers and Container Orchestration software, is a massive game changer from where we were just a few years ago. I was doing this with configuration management, installing lots of complicated software on dedicated hardware, and then constantly looking after these machines. Getting 2am pages too! I am not saying you are not going to get paged anymore, but you should not get paged for trivial things, which is pretty nice.
General Networking
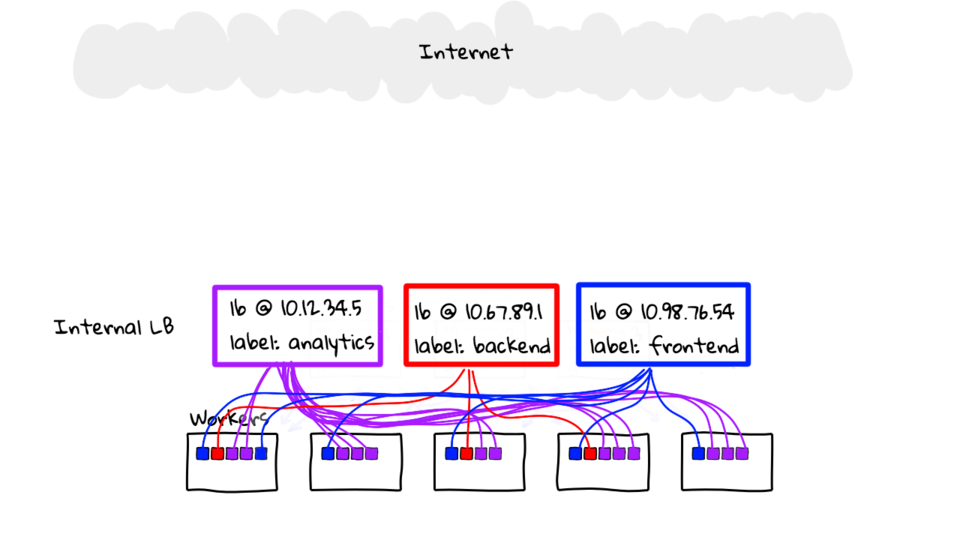
You might be thinking, okay you have those apps running on the Worker Nodes, but what about networking? Well, I conveniently did not mention that because the diagrams are pretty packed. So, lets cover that now. I am just going to move things down and hide the Master nodes we have have more room here. We still have our Worker nodes here with our three different example applications running.
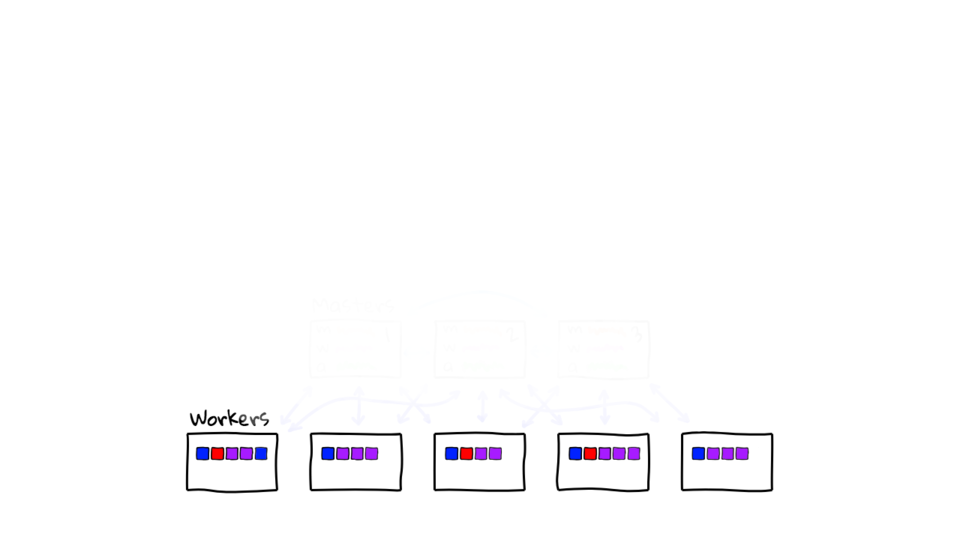
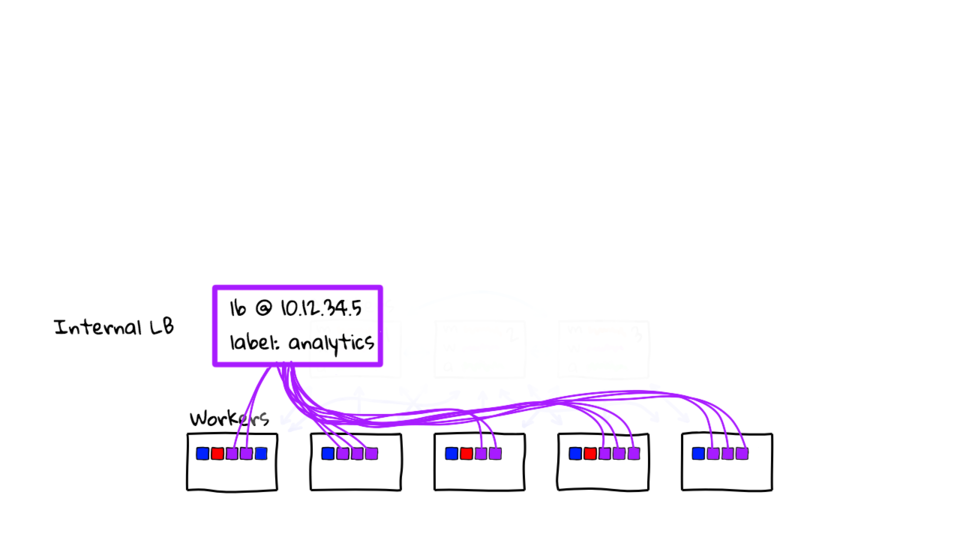
In general, things work something like this. After you ask the Master nodes to deploy your application, you will also ask the Master nodes to deploy a software defined service load balancer.
Lets look at our Analytic application for example. We originally asked for 10 instances of our Analytic to be running in this cluster. These instances are spread out across 5 Worker nodes. So, we need some way of routing traffic to them. Software defined Load Balancing Services basically sit in front of all your application instances. Typically there will be some type of label or flag that the load balancer looks for. This is important because you can scale up or down your application instance count and you want the load balancer to pick these changes up. The load balancer is also mapping external requests to all the various internal IP address and Port numbers of your containerized applications instances.
So, lets deploy a load balancer for the backend and our frontend services too. I should mention that there are way too many options here. You have http load balancer, TCP, and UDP too. It also depends on the Orchestration you are using, and where you are using it. Say for example, you are using Kubernetes in AWS, your options will be different that Kubernetes that you installed on bare metal in a Colo. This is a massive topic, so that it why I am glossing over the details and talking in general here. Having said that, I do want to do a few episodes on common configurations and walk through some examples.
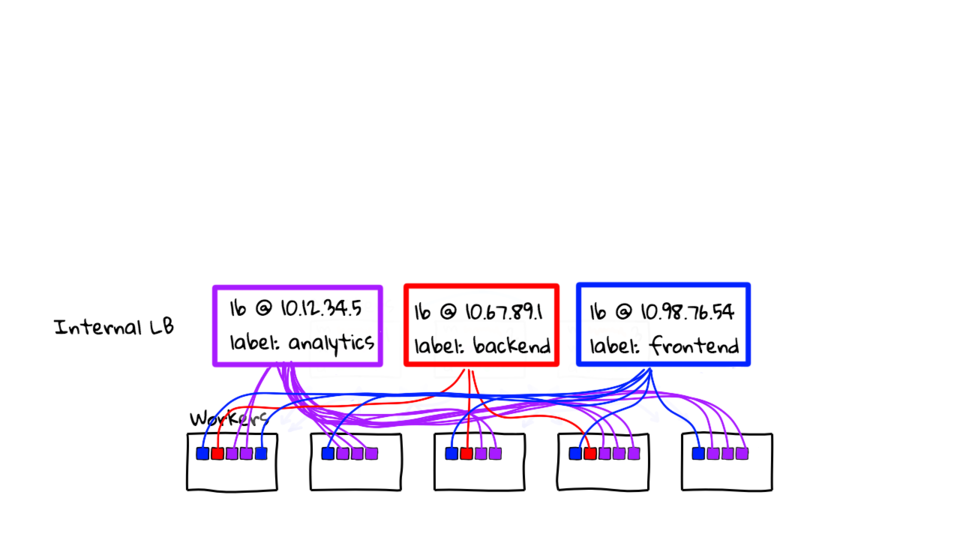
Okay, so we have our Analytics, Backend, and Frontend applications, all sitting behind a non-routable internal cluster address. Everything is all wired up here. But, how do we route traffic from the internet?
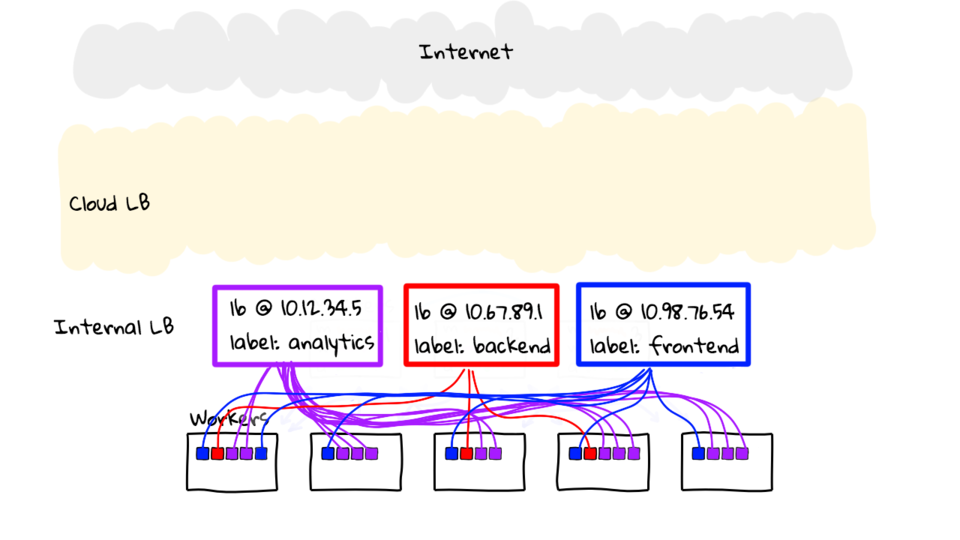
Well, I am going to give the example of using a Cloud Provider here because that is what I am doing in the demo later. Basically, you will create a Cloud load balancer, something like a AWS ELB, or a GCP LB, and then route traffic to this internal Kubernetes load balancer. Then we will do that for the others too.
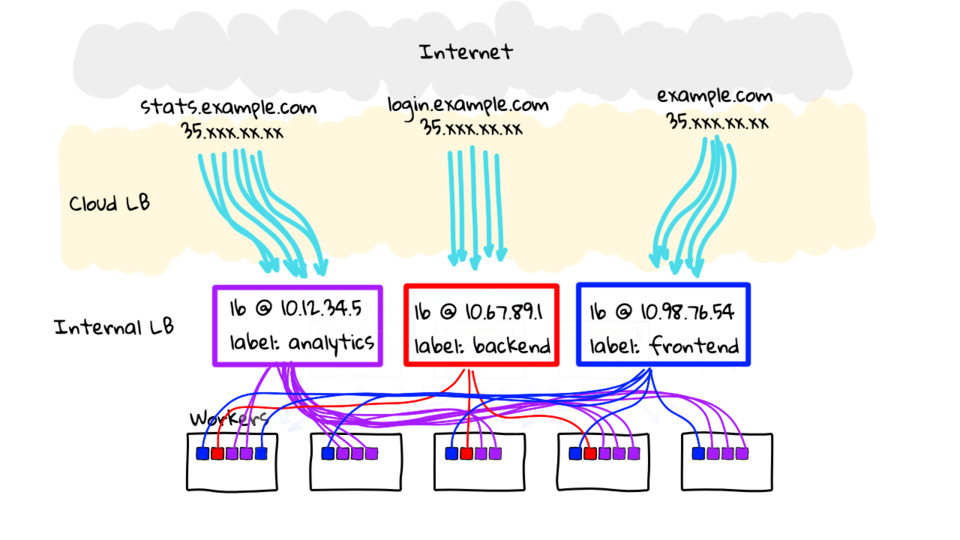
What I have here, is these hostnames, pointing at the external Cloud LB, and then the Cloud LB, is pointing at the Orchestration LB. This seems a little complex but it actually works pretty well. Honestly though, there are so many options, if you can imagine it, you can probably do it. So, I would not get too concerned about it. If you wanted to build your own solution you could totally do that too. It is extremely flexible.
Cool, so that is it for my diagrams, hopefully you found this useful. Lets move on to the demo section of this episode.
Demo
For the demo today, I am going to configure a test cluster using Google Cloud Kubernetes Engine. It is a pretty easy tool that allows you to spin up a Kubernetes in just a few minutes. I wanted to highlight that it is fully managed. Google even looks after the Master nodes for you, without charge, which is pretty cool. Google also manages the OS and deploys rolling upgrades for you. This is not an ad or anything, sure I am biased, but it just works really good for demos.
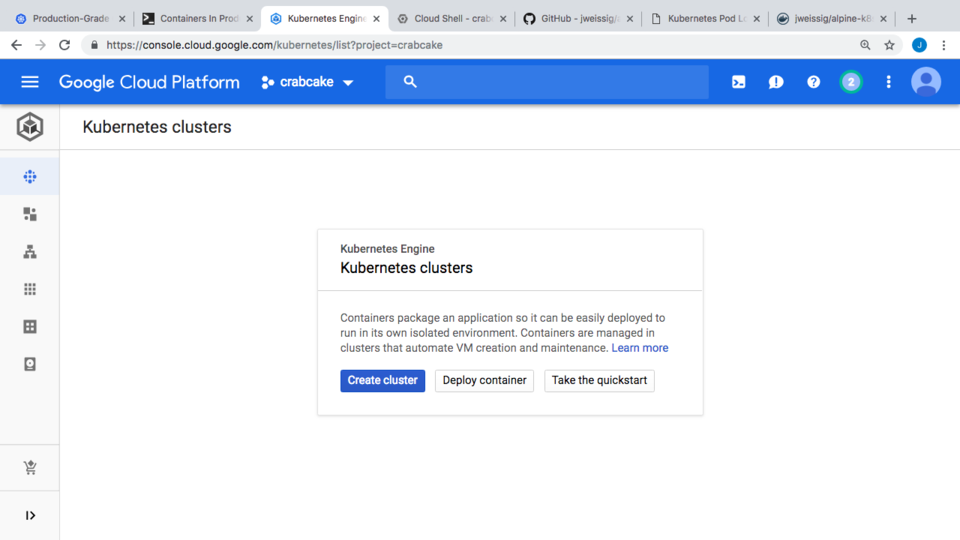
Cool, so lets log into the console. Oh, if you wanted to play around with this, I think all new customers get a $300 credit. All you need is a new gmail address that has never signed up before.
This is the default console. Lets go up to the left hand side here, to this hamburger menu icon, and then down the Kubernetes. This might might be farther down in the list for you, because I use this pretty often, so I pinned it up here.
This panel lets you create new Kubernetes clusters or review your running clusters. I do not have any running right now in this account. So, lets create a new one, just click create cluster, and that will open up the wizard.
On the left hand side here you have a bunch of templates you can use or just pick the values you want. I am just going to pick the values I want. I am just going to use the default name as this is just a test. We will leave the location as Zonal vs Regional. You would use this for spreading the cluster across different data centers to limit your failure modes. Then, I am going to pick us-west1 as my data center, since that is close to me. You can also select things like the Kubernetes version too, if you wanted, maybe you wanted to test a new feature.
Here is where we get to select the amount of Worker Nodes we want. I am going to choose 5 since that it what we chatted about in the diagrams earlier. Finally, we click create. It takes about 3-5 minutes to spin up the cluster. But, I guess that depends on the amount of Worker Nodes you are using too.
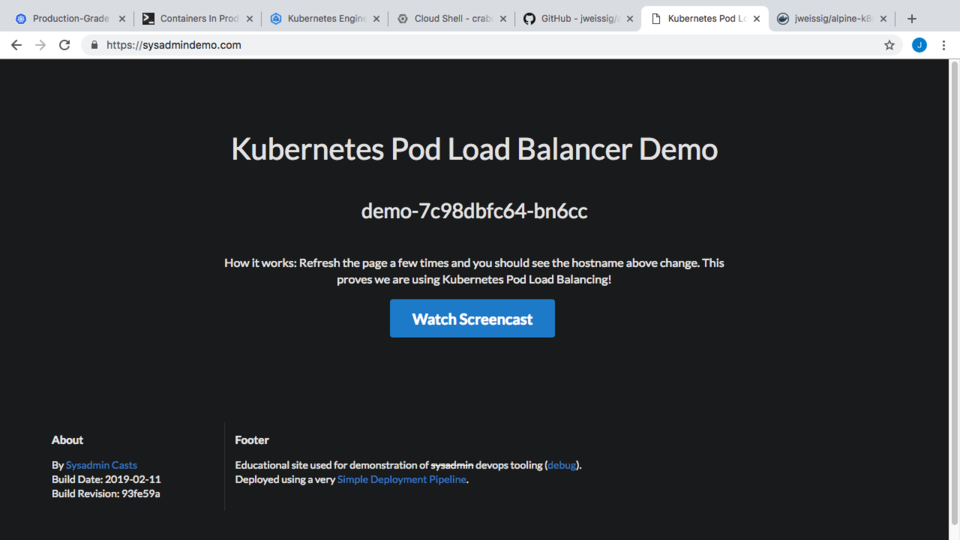
While that is going, I should probably tell you what the demo is. I created an example application here and uploaded it to Github. Basically, it is a website that just prints out the hostname of the container running that instance. So, the idea is that, we scale our application to something like 10 instance, and then can verify things are working. This will prove we have 10 instances running, our internal cluster load balancer is working, and our external Cloud load balancer is working too.
You can actually check out, sysadmindemo.com, where I have a live version of this running. All the links are in the episode notes below. If we refresh the page a few times here, you can see the hostname is getting updated, this basically proves things end-to-end.
Alright, lets jump back to the Cloud Console and set up our demo. The cluster looks ready now. You can click on this connect button here and it will give you the command to authenticate against the cluster for running command-line stuff. I’m going to choose run in Cloud Shell here, this is basically a web based command prompt sitting in Google Cloud, and I like to full screen it too.
Okay, so I have run the first command here, this configures authentication and points our kubectl command at the correct cluster. For example, you might have 5 different clusters, so you need to make sure you are pointed at the right one.
I showed you the demo already, and Github, but I did not show you the Docker Hub page. This page here is the Docker image we are going to run in our Kubernetes cluster. Basically, it is just the image we built from Github. Just wanted to mention this so it all makes sense.
So, we are going to say, kubectl run demo image jweissig and the image name, also I want to tell Kubernetes the port information. This is the port our webserver running the demo app inside the Docker container is listening on. Awesome, that is created now.
$ kubectl run demo --image=jweissig/alpine-k8s-pod-lb-demo --port=5005
deployment.apps "demo" created
I like to just verify things too. Lets run kubectl get deployment demo. You can see we have 1 instance running. But, we will scale that up later.
$ kubectl get deployment demo
NAME      DESIRED   CURRENT   UP-TO-DATE   AVAILABLE   AGE
demo      1         1         1            1           7s
You can get the Worker Node list by running, kubectl get nodes, just for reference.
$ kubectl get nodes NAME STATUS ROLES AGE VERSION gke-standard-cluster-1-default-pool-5dec05b6-1fsv Ready55m v1.11.6-gke.2 gke-standard-cluster-1-default-pool-5dec05b6-2gd2 Ready 55m v1.11.6-gke.2 gke-standard-cluster-1-default-pool-5dec05b6-pgnj Ready 55m v1.11.6-gke.2 gke-standard-cluster-1-default-pool-5dec05b6-qhjh Ready 55m v1.11.6-gke.2 gke-standard-cluster-1-default-pool-5dec05b6-qpfb Ready 55m v1.11.6-gke.2
So, you remember back from our networking diagram, where we needed to configure that software define cluster Load Balancer for our service. That is what I am going to do here. Lets run, kubectl expose deployment demo target port 5005 type NodePort.
$ kubectl expose deployment demo --target-port=5005 --type=NodePort
service "demo" exposed
Again, lets verify, by running, kubectl get service demo. You can see our cluster IP here, that is fronting our demo server. Lets just quickly recap by looking at that diagram again. So, we have our worker nodes, the instance is running, and we configured a cluster load balancer that is fronting the instance. Although, we only have one instance right now, but we will change that in a minute.
$ kubectl get service demo NAME TYPE CLUSTER-IP EXTERNAL-IP PORT(S) AGE demo NodePort 10.39.244.1105005:32544/TCP 8s
So, the next step is to configure a Cloud LB that connects to our demo Load Balancer. Lets do that via a YAML file this time. I am just going to create a file called basic-ingress.yaml and paste in the contents. Since Kubernetes has an integration with Google Cloud you can create external load balancers right from Kubernetes like this. We can saying here, create an ingress load balancer, and send that traffic to our demo service load balancer.
$ cat > basic-ingress.yaml
apiVersion: extensions/v1beta1
kind: Ingress
metadata:
  name: basic-ingress
spec:
  backend:
    serviceName: demo
    servicePort: 5005
Now, lets apply that change to Kubernetes, by running kubectl apply -f basic-ingress.yaml. We can verify things by running, kubectl get ingress basic-ingress. We should see an external IP address in a minute here. Lets just refresh this a few times. Awesome, you can see the address here now. Even though this address has appear here it takes about 10 minutes for this to fully deploy.
$ kubectl apply -f basic-ingress.yaml
ingress.extensions "basic-ingress" created
$ kubectl get ingress basic-ingress
NAME            HOSTS     ADDRESS         PORTS     AGE
basic-ingress   *         35.190.62.154   80        46s
Before we check that IP address, lets scale up our application from 1 instance to 10. Lets check its current state again, by running kubectl get deployments. Alright, lets scale that to 10, by running kubectl scale replicas 10 deployment slash demo. Then, verify again. Awesome, looks like it is all working.
$ kubectl scale --replicas=10 deployment/demo
deployment.extensions "demo" scaled
Cool, lets grab that external load balancer address again, by running Kubectl get ingress basic-ingress, and check it out. It is likely not ready but we can check. I am just going to copy that address. Then lets paste it into the browser and check. Well, as expected, it is still not up and running, it takes about 10 minutes or so. Through the magic of video editing it is now live. I just chopped about 10 minutes out while this was getting setup. You can see now, that as we refresh the page, the hostnames are changing.
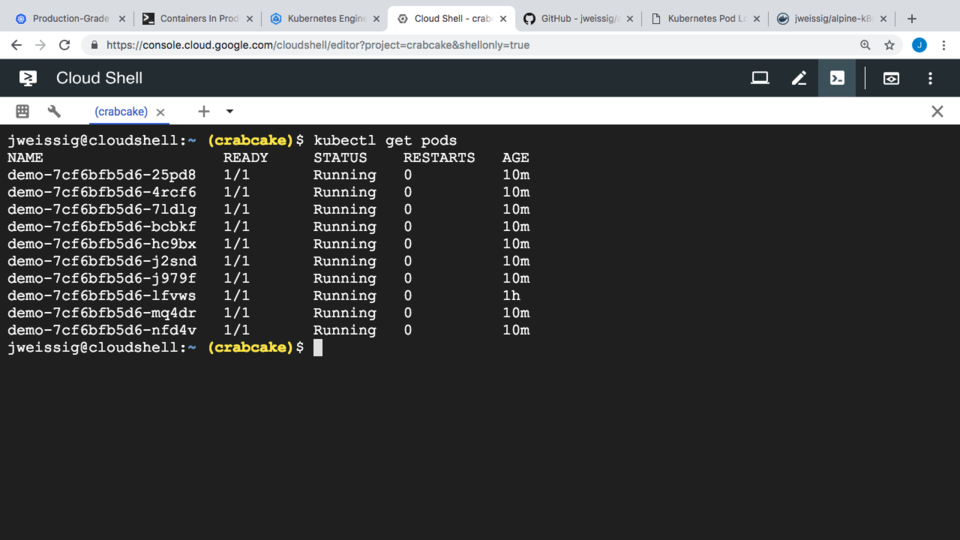
We can verify this by taking note of this hostname here, then flipping back to the command prompt, and running kubectl get pods. This lists out all our container instances and you can see here we have a match. Lets try again, I wll reload the page here, take note of this, and then flip back, and we have another match. Cool, so this basically proves we have a working setup. Obviously, there is way more to Kubernetes than just this, but hopefully this was useful.
Alright, that is it for this episode, thanks for watching. I will see you next week. Bye.